.png)
MIP
Introduction
PKWARE key management support for Microsoft Double Key Encryption (DKE) provides organizations with a simple and seamless experience for administrators. Administrators managing Microsoft’s Information Protection around double key encryption with PKWARE don’t have to worry about the aspects that come from enterprise key management; scalability, auditability, durability, security, and high availability.
Microsoft allows for customers to choose between different types of key management capabilities around their Information Protection suite; Microsoft Managed Key, Bring Your Own Key, and Double Key Encryption. Double key encryption allows organizations to utilize the seamless experiences with encrypted Office file types while also giving customers the benefit of knowing no one else outside their organization can decrypt their files, including Microsoft.
Microsoft DKE uses two keys to access protected content. Microsoft Azure stores one key and the customer holds the second key, which means customers can finally maintain full control of one their keys. Without having both keys, Microsoft cannot decrypt files encrypted with DKE.
How We Integrate
The second key that customers control is managed by a cloud or on-premises instance of the PKWARE Enterprise Manager (PEM). With that DKE controlled by the PEM, an administrator sets what users and groups should have access to the DKE key. Once the key and the users/groups associated with that key are created, the PEM will generate a URL that must be given to the Microsoft Information Protection label with DKE encryption.
When an end user authenticates with their Azure Active Directory, the unified labeling client will retrieve the appropriate DKE keys from the PEM service. If a user tries to right-click Microsoft’s “Classify and Protect” in Explorer or select a label within an Office application, the DKE label will be available.
DKE Keys
PKWARE’s key management support for Microsoft Double Key Encryption (DKE) provides organizations with a simple and seamless experience for administrators. When an end user authenticates with Azure Active Directory, the unified labeling client will retrieve appropriate DKE keys from the PK Endpoint Manager (PEM). To access this screen, go to MIP > DKE Keys.

Following is the description for the columns.
Column | Description |
Name | This column displays the unique name given to DKE key. |
Enable Encryption | This column displays Yes or No indicating whether encryption is enabled with this key. |
Enable Decryption | This column displays Yes or No indicating whether decryption is enabled with this key. |
URL | The URL in this column displays DKE service path used by administrators for defining the location of key service. |
Created At | This column displays the time/date when key was created. |
Updated At | This column displays time/date when the key was last updated. |
This screen also displays the following UI controls for configuration.
- Click Delete button to delete a key.
- Click Copy Link to copy the URL of a key. Refer Microsoft documentation for DKE Labels to know how to use it in the Microsoft Compliance Center.
- Click Edit button to edit the details of a key. Steps of editing are same as adding a DKE key.
Adding DKE Key
Click Add button to add a new DKE key in PEM. The Add DKE Key screen appears.

Following is the explanation of properties that appear while adding a key.
Property | Description |
Name | Enter a unique name for the key. |
Enable Encryption | Check this checkbox to enable encryption with this key. |
Enable Decryption | Check this checkbox to enable decryption with this key. |
Importing & Exporting Keys
If there is a need to move DKE keys from one environment to another, PEM allows this functionality by using the Import/Export capability. Click this button to open DKE Key Import/Export screen.

In the following example: there are two servers, Server 1 and Server 2. Server 1 has DKE keys, but Server 2 doesn’t. Follow the below mentioned steps for exporting key(s) from Server 1 and importing it to Server 2:
- Go to MIP > DKE Keys tab of Server 2. Click Import/Export button.
- Click Download Public Key. The JSON file automatically gets downloaded in the Downloads folder of your PC.
- Go to MIP > DKE Keys tab of Server 1. Click Import/Export button.
- Click Export. The Export – DKE Key Transfer To screen appears.

- In the Upload Public Key to Target Server field, browse and open the JSON file downloaded in step 2 from Choose File button.
- In the Select Keys to Export field, select the checkbox associated with the key(s) you want to export. All existing keys are checked by default. Click OK to download the Key Transfer file to the Downloads folder of your PC.
- Return to MIP > DKE Keys tab of Server 2. Click Import/Export button.
- Click Import. The Import - DKE Key Transfer From screen appears.

- In the Upload Key Transfer File field, browse to the Key Transfer file downloaded in step 6 and select Choose File. Click OK to import the selected key(s) on this server.
- After completing the importing process, the imported key(s) can be seen on MIP > DKE Keys tab of this server.
Common Controls
Search: This feature allows you to filter or search the records in this panel, based on the value entered. A value can be a date, name, or a random text.
Click

- Clipboard: Click this button to copy all the rows visible on the panel to the default clipboard. Press CTRL+V on any Microsoft Application to paste the copied text data there.
- CSV: Click this button to download the data, visible on the panel in CSV format.
- Excel: Click the button to download the data, visible on the panel in Excel format.
Labels
Labels screen allows administrators to view and import security labels from Microsoft into the PK Endpoint Manager (PEM). Labels can be imported from Microsoft by using Import button, or they can be added manually by using the Add button. Once labels are added on this screen, they can be used as remediation options from the MIP Azure Label drop-down in the locker and assignment configuration pages.
Note: The MIP Applications and MIP Configuration pages must be configured prior to importing or adding labels.
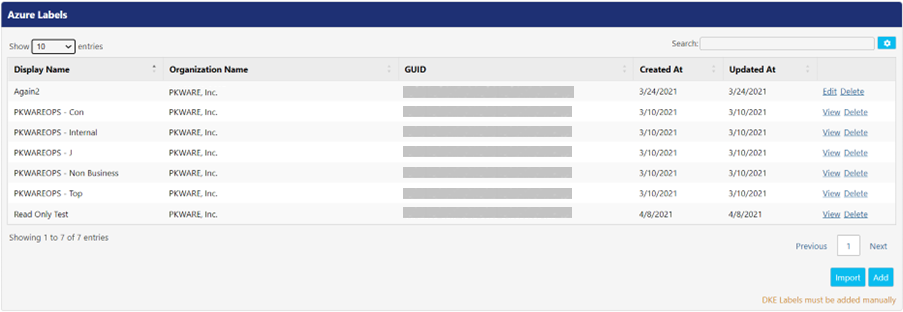
This screen also displays the following UI controls.
- View: Click this link to view the details like Display Name, Organization Name, GUID, etc. for the related label.
- Delete: Click this link to delete the corresponding label from PEM.
Importing MIP Labels
To import labels from Azure, click the Import button to open Import Azure Labels screen. The PEM will display a list of labels that were found in MIP. The user can select the specific label(s) they desire to import and click the Save button.

After the labels are imported, they appear in the Azure Labels screen.
Manually Adding MIP Labels
To add a new label, click the Add button to open Add Azure Label screen.

Following is the description of the fields that appear while adding a label.
Field | Description |
Display Name | Enter a name for the label that clients and administrators can see. |
Organization Name | Enter the organization's name that defined the label. |
Tenant ID | Enter the tenant ID of the application that was created for MIP labeling. |
GUID | Enter a unique identification string for the label. |
Description | Enter the description about the label and its usage. |
User Description | Enter the description about the label to be displayed for the user. |
Config
Using this screen, you can configure the settings required to use the Double Key Encryption (DKE) capability. To access this screen, go to MIP > Config in PK Endpoint Manager (PEM). Click Edit button to edit the listed properties.
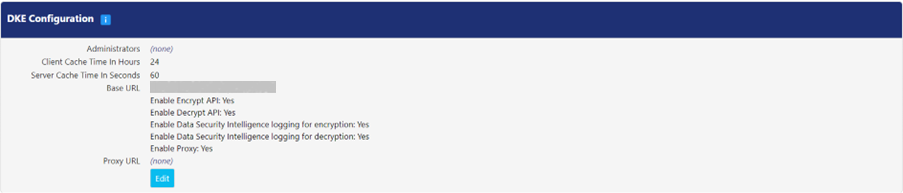
Following is the description of properties:
Property | Description |
Administrators | Define the administrators in this field who can edit or delete the DKE configuration. If this field is left empty, the pre-defined PEM administrator permissions will be enforced for configuration. |
Client Cache Time In Hours | This field displays time (in hours) for which Microsoft can use a DKE public key before asking PEM for a new one. The default value is 24. Click the value to edit the interval. |
Server Cache Time In Seconds | This field displays the duration (in seconds) for which the server caches the list of DKE keys in memory, after which it must access the current information from the database. The default value is 60. Click the value to edit the interval. |
Base URL | Enter the URL that the environment will be called on. This must match the Application ID URL for the Azure Application registration. Note: In the Azure App registration, /mds may not have been included on the end of the URL, but it needs to be added here. Example: https://pkwareoperations.pkware.com/mds An application restart is required on all nodes in the cluster or farm when changes are made to this value. |
Enable Encrypt API | Select this checkbox to enable users to encrypt files with DKE labels. |
Enable Decrypt API | Select this checkbox to enable users to decrypt files with DKE labels. |
Enable Data Security Intelligence logging for encryption | Select this checkbox to enable PK Protect agents to report client log events for DKE encryption in DSI Events panel. |
Enable Data Security Intelligence logging for decryption | Select this checkbox to enable PK Protect agents to report client log event for DKE decryption. |
Enable Proxy | Select this checkbox to direct PEM to communicate through a proxy server when connected to the internet. |
Proxy URL | This field is where the proxy server URL is defined for PEM. |