.png)
Classification
This screen allows you to deploy PKWARE classification to operate with existing PEM Agents by specifying the configuration, user, group, and classification policy. Classification configurations are created and exported from the Classifier Administration console. It is applicable to PEM Agents on Windows machine who are running on version 15.8 or above.
*Note: This functionality is not supported for users on VDI.
To access this screen, go to Archive > Classification.
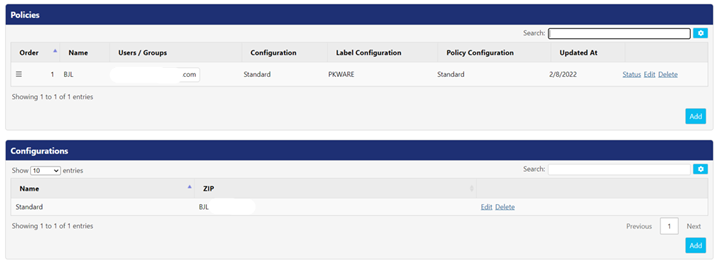
Following actions can be performed on each classification policy and configuration:
- Edit - Click this button to edit the details of an existing policy or configuration.
- Delete – Click this button to delete a policy or configuration.
- Status – Click this button to view the list of all devices which are associated with the configuration policy; you will be redirected to the Device screen that can be accessed via Archive > Devices.
To setup Classification Configuration
To create a classification configuration, follow the below steps:
- Create a classification configuration in Classifier Administration using the documentation provided with the software.
- In Classifier Administration, click top root Classifier Administration on left hand side of the application.
- Click Publish Administration on the right-hand side list under Actions.
- Select a local file store for storing the classification configuration.
- Provide the reason and name of the publication.
3. In Windows Explorer, navigate to the root folder of newly published classification configuration.
4. Select the three folders i.e., Label Configuration, Management, and Messages listed under the root classification configuration and compress them into a zip file.
5. Upload the zip file in the Configuration panel by clicking the Add To access this panel, go to Archive > Classification > Configurations panel. To upload a zip file, follow the below steps:
- Click Add button in the Configuration
- Enter the name of the configuration in the Name
- Upload the classification configuration zip file by clicking Choose File
- Click Save to save the details of the configuration.
6. Once classification configuration is uploaded then you need to create a classification policy.
Create a Classification Policy
Once classification configuration is created and deployed. The next step to create a classification policy for group or users. To create a policy, execute the following:
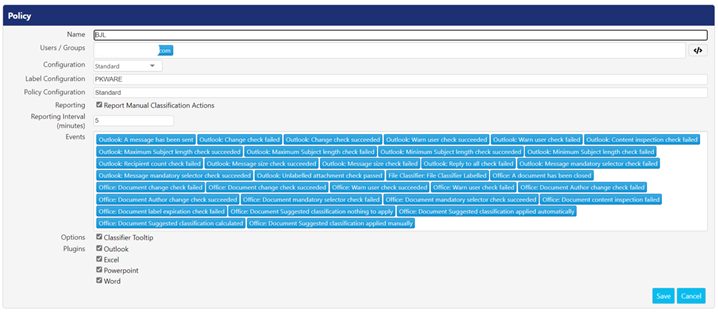
- Click Add button in the Policies panel of the Classification This opens the Policy screen.
- Name: Enter the name of the policy in the Name
- Classification: Enter the Active Directory users or groups who will be associated with the classification policy.
- Configuration: Select the classification configuration from the Configuration drop-down. It lists down all the uploaded configurations.
- Label Configuration: Enter the name for the label configuration. This value can be found in Classifier Administration under Labeling Configurations.
- Policy Configuration: Enter the name of the policy created under the Policies folder in Classifier Administration.
- Reporting: Selecting Report Manual Classification Actions option will report an event in the DSI panel. Selecting this option will display Reporting Interval (minutes) and Events
- The Reporting Interval (minutes) option lets you enter the time interval (in minutes). This option checks how often PEM Administrator should check for classification events. By default, the value is set to five minutes.
- The Events field allows you to enter the classifier events which will be recorded and reported, when observed.
- Options: Checking the Classifier Tooltip will display the applied classification label instead of PK Protect icon.
- Plugins: Checking the options listed under the Plugins will allow classifier add-on to operate in the MS Office applications. The supported applications are:
- Outlook
- Excel
- Powerpoint
- Word
12. Click Save button if you want to save the details of the policy else click Cancel.
13. The classification configuration will be deployed to the declared users and groups and the MS Office add-ins will retrieve the latest classification configuration windows.exe is restarted.