.png)
Lockers
Lockers provide automatic, persistent folder protection across any file system in the environment. When creating a locker on a device, an administrator needs to define details for how the locker will be configured. If the file system can be mounted by a client that can run PK Protect, a locker automatically protects the data stored on the path. As soon as the locker information syncs to the PK Protect client device, anything placed in the locker will be protected. To access this screen, go to Archive > Lockers.
Following actions can be performed on every locker:
- Status – Click this button to view the locker status for the intended device. It displays Locker Status for device <name of the device> This panel displays details such as whether the locker is compliant with the latest policy changes name of the locker, path of folder that needs to be protected, size of the file that needs to be scanned, encrypt or decrypt; any number of files or folders scanned, etc.
- Edit – Click this button to edit the details of the locker. When selected it displays the list of all lockers defined for a device.
- Reset – Refreshes the state of the locker, clearing out any existing information and associated status
- Delete – Click this button if you want to delete all lockers defined for a particular device.
- Enable – Selecting this turns on the locker that is currently disabled (turns on a locker that is stop or disabled).
- Disable - Selecting this turns off the locker that is currently enabled (stops a locker from operating).
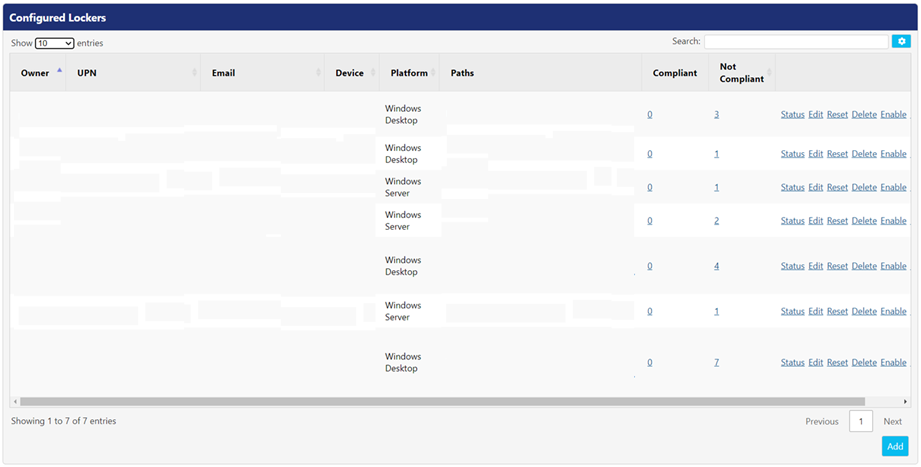
When you browse to the Lockers screen, the Configured Lockers panel displays the list of all lockers defined on the devices in the PKWARE ecosystem. Following is the description of the columns.
Settings | Description |
Owner | This displays the locker’s owner name. |
UPN | This field displays the users Universal Principal Name (UPN). |
This field displays the email address of the locker owner. | |
Device | This field displays the name of the device in the PK Protect application. |
Platform | This displays operating system or the platform of the device hosting a locker. |
Paths | This field displays the path of the folder that is protected on the device. |
Compliant | If the locker is compliant, it means that the agent has received the latest policy changes from the PEM Administrator. |
Not Compliant | If the locker is not compliant, it means that the agent has not received the latest policy changes for the PEM Administrator. |
Viewing Status of Existing Lockers
Click Status button to view the additional details for all lockers defined for a particular device. Following is the description of the columns:
Settings | Description |
Compliance | This field specifies whether the locker is compliant or not. The green circle indicates that the agent has received latest policy changes and red circle indicates that the agent has not received the latest policy changes for the PEM Administrator. |
Status | This field indicates any issue occurred in the agent. Possible issues might be invalid configuration, invalid path, or location. |
Name | This field displays the name of the selected locker(s) owned by the user. |
Path | This field displays the location that is protected on the device. |
Size | It displays the total size of the protected file(s) and folder(s) on the device. |
Files | The number displays the count of protected files. |
Folders | The number displays the count of protected folders. |
Plaintext | The number displays the count of un-protected text files in the protected path. |
Encrypted | The number displays the count of encrypted files in the protected path. |
Sensitive | The number displays the count of sensitive files in the protected path. |
Error | This number in this field displays the count of errors occurred in the protected path. |
Reported At | This field displays the timestamp of the status report. |
Adding a new Locker
To add a locker, click Add button. This will display the Device Search screen, where you can search for the device on which locker needs to be defined. Following settings need to be configured:
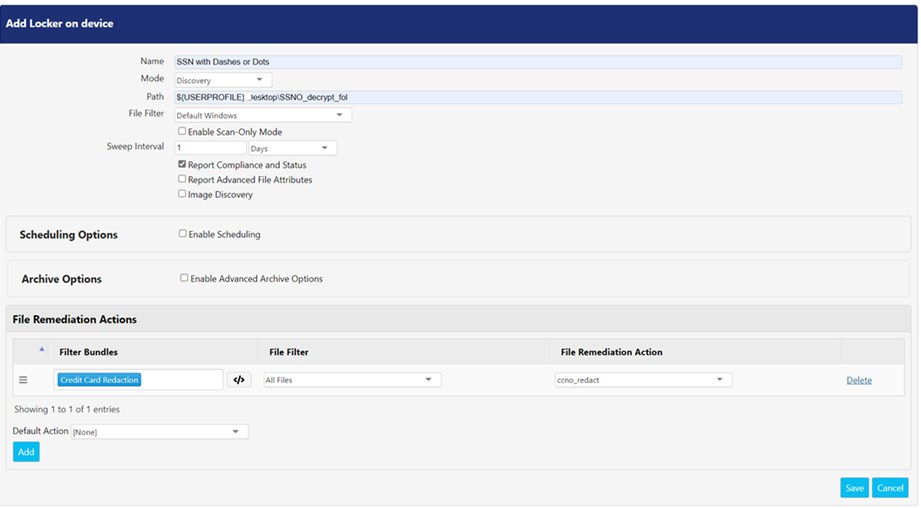
1. Common Attributes
There are few common attributes that need to be configured for creating a new locker.
Settings | Description |
Name | Enter the name of the locker in this field. |
Mode | Select either Discovery or Encrypt from the drop-down. |
Path | The path defined in this field specifies the exact folder path on the remote device that is set up as a locker. You may use a Universal Naming Convention (UNC) path. If the path does not exist on the device, the PEM Agent will try to create the path. If the path is invalid (for example, by referring to a path without permissions to access) locker will not get created. Do not place an Assignment in the same path as a Locker. This can lead to a variety of behaviors. |
File Filter | Select the desired file filters from the drop down. You can create filters in the File Filters screen that can be accessed via Advanced > File Filters. The file filter selected here will only be applicable to the base functionality of Encryption, Decryption, and Discovery. For more information on file filters, refer File Filters. |
Algorithm | Select the desire algorithms from the drop down. This will specify which algorithm will be used during encryption operations for this locker. This field is visible when Encrypt is selected in the Mode drop-down. |
Smartkey | This drop-down displays the list of all Smartkeys which can be used for encrypting data in the locker. This field is visible when Encrypt is selected in the Mode drop-down. The Smartkeys listed are related to the user and devices associated with the locker. If the Smartkey you prefer to use does not appear in the menu, ensure that the locker user has access of it. |
Compress | This option compresses a file for users in the defined scope. If a file is triggered, it will be compressed before encryption process take places. The encryption process gets much faster if you do not select this option. This option is available when Encrypt is selected in the Mode drop-down. |
Enable Scan – Only Mode | This option executes a scan to assess the size of a potential remediation project. PEM Administrator will scan the target system and provides the admin with progress information (in %) as scan continues. |
Sweep Interval | This option is a secondary scan which runs to ensure that all the files are processed. Sometimes there is a possibility that system under extremely high load will not expose the correct file system event to PK Protect. Due to this reason the file will not get processed. The time interval specifies how often a secondary scan should run. The default setting is 84, 600 second (24 hours) i.e., Day. *Note: On Solaris, AIX and HP-UX systems, there are no system event notifications for PK Protect. |
Report Compliance and Status | The locker path communicates its status to the PEM Administrator, generating if the agent running the locker has not receive the latest PEM Administrator policy changes. |
Report Advanced File Attributes | This option provides additional properties for MS file types when the discovery task is triggered. Advanced file attributes include File Created Date, Created By, and Last Saved Date. Last Saved is reported to DSI when applicable. Note: This feature is not supported in agents older than 15.9. |
Image Discovery | Selecting this option allows agents to discover the sensitive information in the supported image file types. This option is visible when Discovery is selected in the Mode drop down. |
Report successful Encryptions | If Data Security Intelligence (DSI) is enabled, each file added or changed in the locker, will be reported in the Audit Log. Note: Reporting on successful encryption can generate thousands of events, uncheck this option if you do not want to report encryption events generated by a locker. This option is visible when Encrypt is selected in the Mode drop down. |
Report Encryption Failures | A locker might fail to encrypt a file on the initial attempt. This might be caused if the file is being locked, open, or due to some other environmental issue. This option is visible when Encrypt is selected in the Mode drop down.. Select this option if you want to report any encryption failures events to PEM Administrator. |
2. Scheduling Options
Select Enable Scheduling to configure the locker scheduling options. Following options are available
*Note: Agents earlier than 16.60 do not support scheduling feature.
Fields | Description |
Start Time and Pause Time | Select the time in Start Time and Pause Time fields. This identified the time range during which a locker will run The time is based on the agent. |
Passive Mode | Passive mode queues file(s) to be processed later, if they’re encountered outside of the scheduling range. |
3. Archive Options
To enable the archive remediations for a locker, check the Enable Advanced Archive Options option. This setting is visible when Discovery is opted in the Mode drop-down. On enabling, it displays following options:
Fields | Description |
Extensions | This field displays the file extensions that would be discovered or remediated. |
Depth | Indicates the number of archive levels a locker should execute in. E.g., If you wish to scan a file that is in an archive, and that archive exists inside another archive, the appropriate depth level should be defined as a 2. |
Preserve Signatures | The original signatures of an archive when the locker discovers or remediates file. |
Extract Single File Archives Modified by Remediation Actions | If checked, when a single file archive is remediated, the underlying file will be extracted on disk and the original zip file is deleted. By default, this option is selected. If unchecked, the archived will remain intact and is remediated. |
Process Encrypted | If checked, the agent will scan encrypted files within an archive. With this box checked, if there is a remediation action that modifies the file, the file will remain decrypted unless the 'encrypt' action is selected as part of the remediation action. |
4. Re-Encryption
Re-encryption within a locker allows the PK Protect service the ability to change the encryption key protecting the archive file. The identity running the PK Protect Locker Service needs to have access to the existing key and the new key for re-encryption to work properly.
To enable re-encryption for a locker, check the Enable Re-Encryption option. This setting is visible when you select Encrypt in the Mode drop-down. Re-encryption has the following options:
Fields | Description |
Report Successful Re-encryption | Select this option if you want to report any successful re-encryption events to PEM Administrator. When this option is enabled, it will report a DSI event when re-encryption event occurs. E.g., an event is reported when a file was encrypted with Key A before entering locker folder and is re-encrypted with Key B by the locker service. |
Report Re-encryption Failures | Select this option if you want to report any re-encryption failures events to PEM Administrator. E.g., an event is reported when a file was encrypted with a passphrase before entering a locker folder and is supposed to be encrypted with Key B by locker service. If the re-encryption did not occur, then this re-encryption failure event is reported to PEM Administrator. |
5. File Remediation Actions
The Locker uses the Discovery feature to scan the content of a file to determine whether it should be encrypted. When Discovery is selected in the Mode drop-down, the content of file can be remediated as per the action specified in the File Remediation Actions. To learn more about each remediation action, refer
To add multiple filter bundles in the File Remediation Actions panel, click Add button. Similarly, you can delete a filter bundle by clicking Delete button.
When Discovery is selected, following fields are displayed:
Fields | Description |
Filter Bundles | This field lists all the filter bundles defined in the Discovery screen. These bundles are used for scanning sensitive data within a file. The Advanced Definition feature can be used with discovery filter bundles. |
File Filter | These drop-down displays all the file filters defined in the File Filters screen that can be accessed via Advanced > File Filters. This feature allows you to scan only those file extensions and paths which are specified in the filter. To learn more, refer File Filter. |
File Remediation Action | This field displays list of all remediation actions that can be applied on to a discovered file. The order of remediation action is important as PEM Agent processes the remediation actions list from top to down. E.g., if an locker has two remediation actions, the first remediation action at the top looks for ‘Secret’ and has a remediation action that will encrypt and move the file. The second remediation action looks for, ‘‘Sensitive’, and takes a remediation action by deleting the file. If agent finds ‘Secret’, it will only apply the first remediation action i.e, encrypting and moving the file. If agent finds ‘Sensitive’, it will only apply the second remediation action i.e., deleting the file. |
Once you’ve configured all the settings, click Save button to make the changes effective else click Cancel.
Use Cases
Example Use Case
Setup - The PK Protect Locker Service is running as Active Directory Service account "PKWARE". The PKWARE identity has access to Community Key A and Community Key B. The Locker is setup to enable re-encryption and to protect data with Community Key B.
Scenario | Locker Action |
A file encrypted with Key A is added to locker. | The Locker will re-encrypt the file to Key B because the identity has access to Key A and Key B. |
A file encrypted with Key C is added to locker. | The Locker will not re-encrypt the file to Key B because the identity does not have access to Key C. |
A file encrypted with a passphrase is added to locker. | The Locker will not re-encrypt the file to Key B because it requires a passphrase to decrypt. |
A file encrypted with a PGP Key or x509 certificate is added to locker. | The Locker will not re-encrypt the file to Key B because it requires a certificate or PGP key to decrypt. |
Applying Multiple Keys to Lockers with Subfolders
PK Protect allows subfolders in a locker to be controlled by different encryption keys. The PEM Administrator just needs to create multiple entries for the Locker configuration for a device.
Example Use Case
Setup - There is a file server with files in the root directory ("P:\Shares\)" and subfolders than need to be controlled by different keys.
Locker Path | Smartkey |
P:\Shares | Key A |
P:\Shares\Engineering | Key B |
P:\Shares\HR | Key C |
To accomplish this, add three lockers with separate paths and Smartkeys:
- Click Add Locker.
- Identify the server and owner of that locker.
- Click Add Locker.
- Set the Pathas P:\Shares.
- Set Smartkeyto Key A.
- Set other parameters as required.
- Click Save.
- Repeat Steps 3-7 with the appropriate Paths for Key B and Key C.
- Click Done.
Now a file is placed into the following folders
File Path | Action | Explanation |
P:\Shares\test.txt | File is encrypted with Key A | The file is placed in the root folder of the "Shares" locker, which is controlled by the Locker Service, therefore it is encrypted with Key A. |
P:\Shares\Engineering\test.txt | File is encrypted with Key B | The file is placed in the root of a subfolder which is controlled by the Locker Service, therefore it is encrypted with Key B. |
P:\Shares\Engineering\Releases\test.txt | File is encrypted with Key B | The file is placed in the subfolder of the "Engineering" locker, which is controlled by the Locker Service, therefore it is encrypted with Key B. |
P:\Shares\Accounting\test.txt | File is encrypted with Key A | The file is placed in a subfolder of the "Shares" locker, and not in the "Engineering" or "HR" folders, therefore it is encrypted with Key A. |