.png)
Assignments
Assignment
The Assignments provide an easy way for deploying set of instructions for tasks, to control client end points. An Assignment enables mass deployments because of their generic scope of assigning users. To access this screen, go to Archive > Assignments.
Difference between Assignments and Lockers
There are some major differences between Assignments and Lockers:
| Assignments | Lockers | Assignments & Lockers (Similarities) |
|---|---|---|
| Assignment supports mass deployments because of their scope. | Lockers are setup per device. | Both support creation of encryption folder. |
| The assignments run during active windows interactive session. | It requires windows service but no interactive session. | Both can be operated on all three types of platforms i.e., Windows, Linux and MacOS. |
| Multiple locations can be added in assignments. | Only one location can be added or supports single location. | Both supports Discovery. |
| Supports the creation of Decryption folder. | A decryption folder cannot be created. | Both supports re-encryption process. |
Provides support for prioritized list of Smartkeys. | There is no support for prioritized list of Smartkeys. | |
| Use of only Community or Personal Smartkeys. | You can use only Community or User created Smartkeys. |
Adding a new Assignment
There are three types of assignments that can be defined:
- Discovery
- Decrypt
- Encrypt
To define a new assignment, click Add button and configure the following settings:
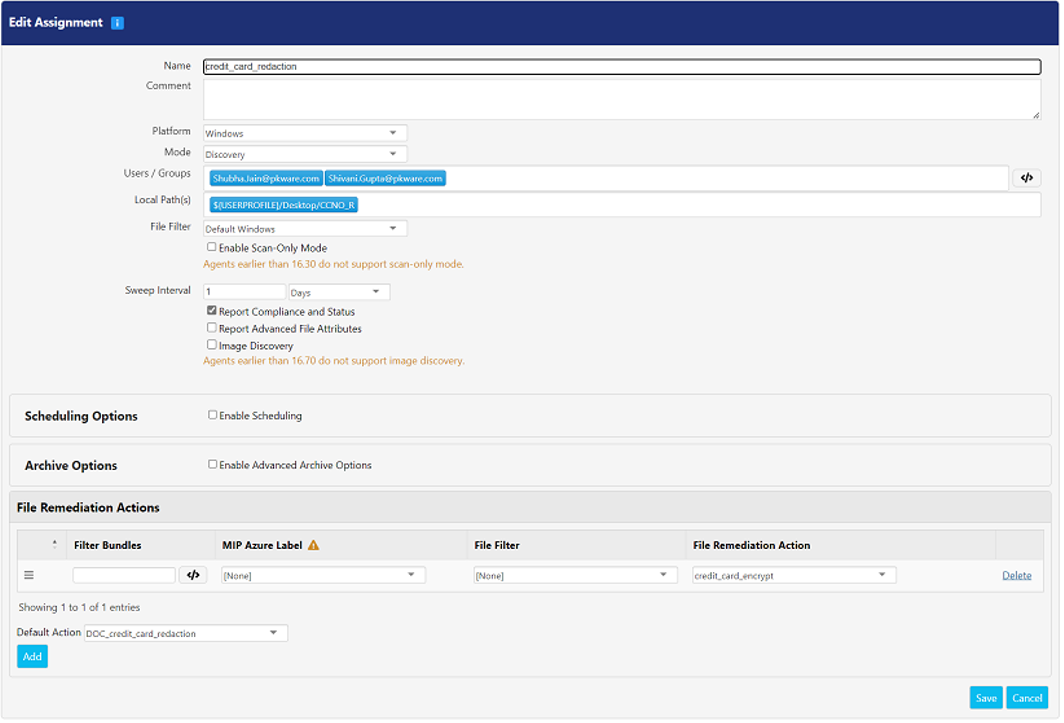
Common Attributes
There are few common attributes that need to be configured for creating a new assignment.
| Fields | Description |
|---|---|
Name | Enter the name of the assignment. The name must be descriptive. |
| Comment | Enter any additional information in this field, if required. |
| Comment | There are different platforms on which assignments are supported i.e., Windows, Linux, OSX, etc. |
| Mode | There are three types of assignments i.e., Discovery, Decrypt, and Encrypt.
|
| Users/Groups | This field displays the list of Active Directory users and groups. To search users, you can make use of Advanced Definitions feature. *Note: A user can be defined in more than one assignment, the first one in the assignment processing list controls the action on a location(s) of a device. |
| Local Path(s) | This field contains the exact path of the folder where the files are kept for discovery, encryption, or decryption. You can use the Universal Naming Convention (UNC) path or can map a network drive to define this path. If path does not exist on the specified device, then PK Protect Agent will create a path. If path is invalid, no assignment will be created. This path is relative to PK Protect Agent, if mounted drive exists on the remote device, it can be referenced through drive letter. You can use variables for referencing user or device specific locations. The format for referencing a location is ‘${Variable}’. *Note: if many users in the scope of the assignment can see the same remote drive, issues can arrive. When using remote path, scope must be locked down to one device. |
| File Filter | Select the file filters from the drop-down. The file filters are created in the File Filters tab that can be accessed through Advanced > File Filters. To know more, refer File Filters. |
| Algorithm | This field displays the list of algorithms which is applied on the data that need to be encrypted. This field is visible when Encrypt is selected in the Mode drop-down. |
| Community Key(s) | This field allows you to add Smartkeys defined by user and administrators. This field is visible when Encrypt is selected in the Mode drop-down. |
| Compress | This option compresses a file if you fall within a scope. The file is compressed before encryption process takes places. The file does not get compressed if this option is not selected. This encrypts the data much faster. |
| Enable Scan-Only Mode | This option scans the target system and provides the admin with progress information (in %) as scan continues. |
| Sweep Interval | This option is a secondary scan which runs to ensure that all the files are processed. Sometimes there is a possibility that system under extremely high load will not expose the correct file system event to PK Protect. Due to this reason, the file will not get processed. The time interval specifies how often a secondary scan should run. The default setting is 84, 600 second i.e., Day. *Note: On Solaris, AIX and HP-UX systems, there are no system event notifications for PK Protect. |
| Report Compliance and Status | The assignment path communicates its status to the PK Endpoint Manager (PEM), which in turn generates a report whether the PK Protect Agent has received latest policy change or not. |
| Report Advanced File Attributes | If you want to provide more details on specific file type on when the discovery task is triggered, opt for this option. This option is visible when Windows is opted as a Platform. Supported file types are: docx, xls, xlsx, ppt, pptx, vsd, one. |
| Image Discovery | Selecting this option will allow agents to discover the sensitive information in the supported image file types. |
| Encryption Events | This option is visible on screen when Encrypt is selected in the Mode drop-down. Following settings are available:
|
| Decryption Events | This option is visible on screen when Decrypt is selected in the Mode drop-down. Following settings are available:
|
Scheduling
To enable scheduling for an assignment, check Enable Scheduling option. On enabling, it displays following options:
*Note: Agents earlier than 16.60 do not support scheduling feature.
| Fields | Description |
|---|---|
| Start Time and Pause Time | Select the time in Start Time and Pause Time field. The time must be selected as per agent’s local time for an assignment to run in that specified time range. |
| Passive Mode | This feature queues the files to be processed even when outside of the scheduling. |
Re-encryption
To enable re-encryption for an assignment, check the Enable Re-Encryption option. This setting is visible when you select Encrypt in the Mode drop-down. On enabling, it displays following options:
| Fields | Description |
|---|---|
| Report Successful Re-encryption | Select this option if you want to report any successful re-encryption events to PEM Administrator. |
| Report Re-encryption Failures | Select this option if you want to report any re-encryption failure events to PEM Administrator. |
Archive Options
To enable the archive remediations for an assignment, check the Enable Advanced Archive Options option. This setting is visible when Discovery is opted in the Mode drop-down. On enabling, it displays following options:
| Fields | Description |
|---|---|
| Extensions | This field displays the file extensions that would be discovered or remediated. |
| Depth | The number of archive levels deep the assignment should execute in. E.g., If a file is within an archive i.e., at the top-level archive. The depth level is defined as 2. |
| Preserve Signatures | This preserves the original signatures of an archive when the assignment discovers or remediates file. |
| Extract Single File Archives Modified by Remediation Actions | If checked, the underlying file from an archive is remediated, extracted on disk and the original zip file is deleted. If unchecked, the file remains intact and is remediated. |
| Process Encrypted | If checked, the agent will scan encrypted files within the archive. With this box checked and there is a remediation action that modifies the file, the file will remain decrypted unless the 'encrypt' action is selected as part of the remediation action. |
File Remediation Actions
The Assignments use the Discovery feature to scan the content of document to determine whether it should be encrypted or not. When Discovery is selected in the Mode drop-down, the content of file can be remediated as per the action specified in the File Remediation Actions. To know more, refer
To add multiple filter bundles in the File Remediation Actions panel, click Add button. Similarly, you can delete a filter bundle by clicking Delete button.
When Discovery is selected, following fields get visible:
| Fields | Description |
|---|---|
| Filter Bundles | This field lists down all the filter bundles defined in the Discovery screen. These bundles are used for scanning the sensitive data within a document or file. You can make use of Advanced Definition feature for searching filter bundles. |
| MIP Azure Label | This field lists down all the MIP labels defined in the MIP screen. This feature discovers a specific MIP label based on the selection. |
| File Filter | This drop-down displays the list of all the file filters defined in the File Filters screen that can be accessed via Advanced > File Filters. This feature allows you to scan only those file extensions and paths which are specified in the filter. To know more, refer File Filter. |
| File Remediation Action | This field displays list of all remediation actions that can be applied on the filter bundle. The order of remediation action is important as PK Protect Agent processes the remediation actions list from top to down. E.g., if an assignment has two remediation actions, the first remediation action at the top looks for ‘Secret’ and has a remediation action that will encrypt and move the file. The second remediation action looks for, ‘Secret’ + ‘Sensitive’, and takes a remediation action by deleting the files. If agent finds ‘Secret’, it will only apply the first remediation action i.e, encrypting and moving the file. If agent finds ‘Sensitive’, it will only apply the second remediation action i.e., deleting the file. |
Once you’ve configured all the settings, click Save button to make the changes effective else click Cancel.
Viewing Existing Assignments
On clicking Assignment in the navigation panel under the Archive, the default screen appears. It displays list of all assignments. Following is the description of the columns:
| Columns | Description |
|---|---|
| Name | This field displays the name of the assignment. |
| Users/Groups | This field displays the list of users and groups. It defines the scope of an assignment. |
| Platform | This field displays the operating system of the device. |
| Mode | It displays the type of assignment i.e., Discovery, Decrypt or Encrypt. |
| Location | It displays the scan locations on the end points. |
| Compliant and Non – Compliant | These fields indicate whether agent has received then latest policy changes from PEM. If agent has communicated with PEM post latest policy changes, then value in Compliant field changes to 1 else the value in Non-Compliant field changes to 1. |
Within this screen, you can perform some actions on every assignment:
- Status – Click this button if you want to view the status of the assignment. On clicking, it displays Locations of Assignment This panel displays details such as the size of the file that needs to be scanned, encrypt of decrypt, any number of files or folders scanned, were there any plaintext in the file, any error occurred while performing an operation, etc.
- Edit – Click this button if you want to update the details
- Clone – Click this button to create a replica of an existing assignment with exact details.
- Delete – Click this button if you want to delete an assignment.