.png)
Protection Policies
The File Protection Policies contain information pertaining to policy actions and are selected by a Target. This is a one-to-many relationship, where a single File Protection Policy can be selected by many Targets. To access Protection Policies page, go to Policies > Protection Policies.
This displays File Protection Policies panel which lists down all the policies defined.
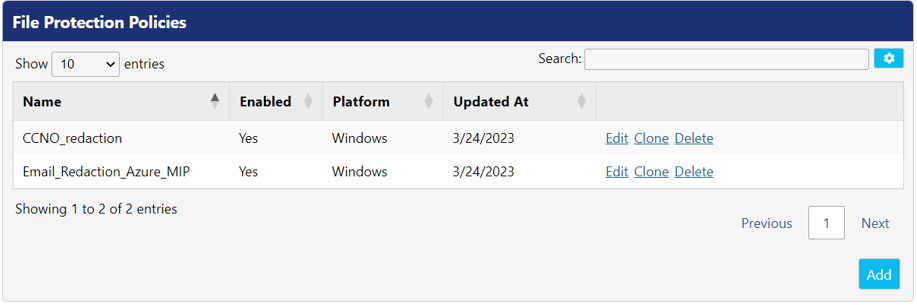
Following actions can be performed on each File Protection Policy.
Edit – Allows you to edit the information of the selected file protection policy.
Delete – Click this button if you want to delete the selected file protection policy.
Clone – Allows you to copy the configuration of an existing file protection policy which can be edited without impacting the original one.
The File Protection Policies panel displays the list of all file protection policies defined in PEM Administrator. Following is the description of the columns.
Column Name | Description |
Name | This field displays the name of the file protection policy. |
Enabled | This field displays whether the file protection policy is enabled for selection within targets. |
Platform | This field display the platform for which protection policy is defined. There are three supported platforms i.e., Windows, MacOS, and Linux. |
Updated At | This field display the date when File Protection Policy was updated. |
To Add a File Protection Policy
To add File Protection Policy, the following attributes needs to be configured:
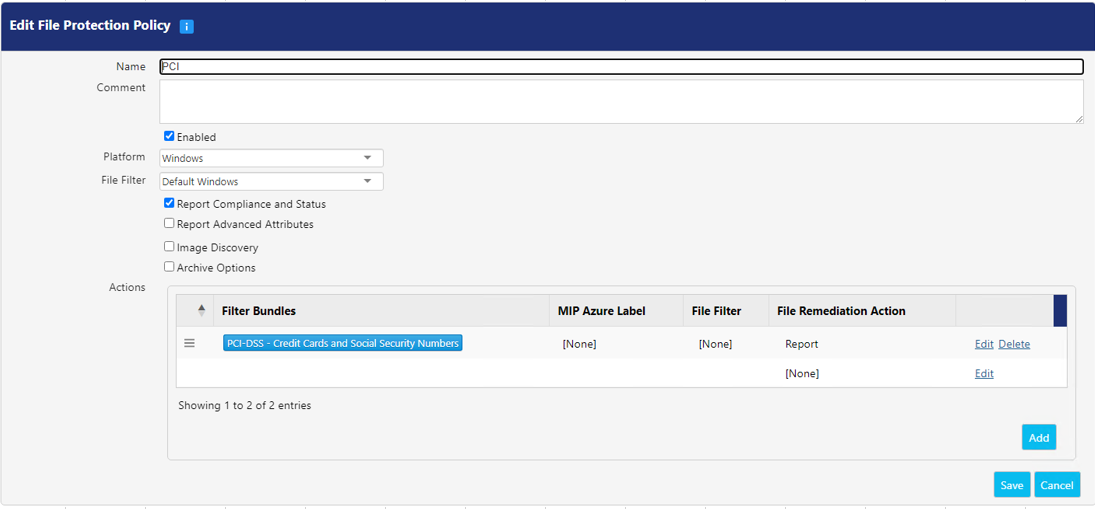
Attributes | Description |
Name | Enter the name of the file protection policy. |
Comment | Enter any additional information in this field, if required. |
Enabled | By default, this option is selected. |
Platform | There are different platforms on which File Protection Policy are supported i.e., Windows, Linux and OSX. |
File Filter | Select the desired file filters from the drop-down. The file filters are created in the File Filters tab that can be accessed through Advanced > File Filters. |
Report Compliance and Status | Checking this option will communicate the status to PEM Administrator, which in turn generates a report whether the PEM Agent has received latest policy change or not. By default, this option is selected. |
Report Advanced Attributes | This option provides additional properties for MS file types when the discovery task is triggered. Advanced attributes include file Created Date, Created By, and Last Saved Date. Last Saved is reported to DSI when applicable. |
Image Discovery | Selecting this option allows agents to discover the sensitive information in the supported image file types. |
Archive Options | To enable the archive options for File Protection Policy, check the Archive Options. When enabled, it displays following options:
|
Actions | The File Protection Policy uses discovery to scan the content of a file to determine whether it should be remediated. The content of file can be remediated as per the action specified in the File Remediation Actions column. To add multiple filter bundles in the Actions panel, click Add button. Similarly, you can delete a filter bundle by clicking Delete button. Following fields are displayed in the Actions panel:
|
Once you have configured all the settings, click Save button to make the changes effective else click Cancel.