.png)
Basics
To complete the registration process and configure system integrations of PK Endpoint Manager (PEM), use the Basics tab. Depending on the desired environment, different PK Protect components need to be configured.
Server Status
The PKWARE support team uses the server status information to diagnose incidents and problems in the PEM. The screenshot below displays the fields in this panel.

Following is the description for fields.
Field | Description |
Product | It displays the name of the product. |
Application Version | It displays the installed version of PEM. |
Database Version | It displays the linked version of database. |
Application URL | It displays the URL of the running instance. |
Support | This field lets you download the server or user logs in a zip format. By default, the package is downloaded in the Downloads folder of the local machine.
Click Download button to download logs for the selected user. These logs include information about devices, assets, and AD groups owned by the user.
|
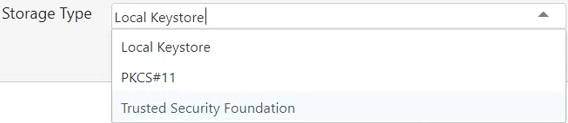
Keystore | This field displays the selected storage type. It is configured before registering the PEM. During configuration, select from three options in Storage Type drop-down that appears on clicking the selected storage type next to this field.
By default, PK Protect selects the Local Keystore configured during installation. If you are integrating PK Protect with QLabs, choose Trusted Security Foundation. |

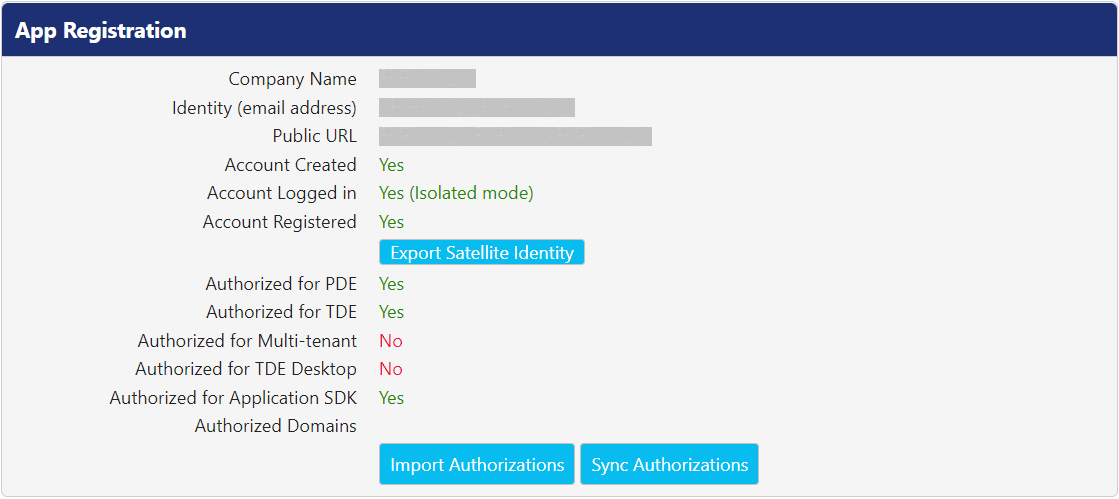
App Registration
PEM needs to be registered before it can be used. The registration process alerts PKWARE that the instance is online and ready for activation and licensing. A public URL is required in this process to direct future traffic to PEM. Once an instance is registered with PKWARE, users with a PK Protect-associated email domain will be directed to use the server for all actions.
Following is the description for fields.
Field | Description |
Company Name | This field displays name of your company. Click the name to edit it. |
Identity (email address) | The PEM connects to the PK Protect Cloud for licenses and updates through the Identity email. This account also facilitates key management to external users through the PK Protect Cloud. Click the address to edit it. |
Public URL | This field displays the external URL for the server. This value is the publicly routed DNS entry, for the users who are accessing PEM from outside your organization. Click the URL to edit it. |
Account Created | If a site account has been created, this field displays Yes. If not, one must be created. To learn more about creating site accounts, visit Creating an Online Account and Creating an Isolated Account. |
Account Logged In | If the account is connected to PK Protect Cloud, this field displays Yes (online). If the account is isolated , it displays Yes (isolated). |
Account Registered | If the value is set to Yes, the domain account is registered. |
Authorized for PDE | If the value is set to Yes, Persistent Data Encryption is authorized for use. |
Authorized for TDE | If the value is set to Yes, Transparent Data Encryption (TDE) authorized for use. |
Authorized for Multi-tenant | If the value is set to Yes, the server is authorized for Multi-tenant administration of TDE. |
Authorized for TDE Desktop | If the value is set to Yes, Desktop TDE is authorized for use. |
Authorized for Application SDK | If the value is set to Yes, PK Protect Software Development Kit (SDK) is authorized for use. |
Authorized Domains | This field lists all the domain name(s) allowed to share keys externally from PEM. This field will be populated by a PKWARE representative during PEM installation. This list controls which users are authorized and which are Guest Accounts. |
Creating an Online Account
Creating an online account will allow the PEM to periodically sync with the PK Protect Cloud.
Create an online account, if:
- You want to allow internal users in a PK Protect environment to create and use Smartkeys with people outside the organization (external users).
- You want external users to create and use Smartkeys with internal users.
- You want to automate the site registration and license acquisition process.
Note: You must create an online account to use Smartkeys with people outside the organization.
Registering an Online Server
Click the Create Account Online button after filling in the registration details. Your account will be created in the PK Protect Cloud and licenses will be synced down to your environment after the PK Protect Cloud defines them for your site.
Creating an Isolated Account
Creating an isolated account will configure PEM in such a way that it doesn’t sync with the PK Protect Cloud. Registration and licensing are completed in a manual out-of-band communication. You will need to export some JSON data and send it to PKWARE. Then PKWARE will send back JSON data to import.
Create an isolated account if:
- You do not want to allow PK Protect users to use Smartkeys with external users.
- You do not want PEM to connect with the PK Protect Cloud.
Registering an Isolated Server
- Under App Registration, enter site registration fields.
- Click Create Account Isolated. This button creates the site account and logs it into the database. The Logged In field will display Yes (Isolated mode).
- Click the Export Satellite Identity link that appears. You will be taken to a separate screen to download server registration file.
- Copy and send that file back to PKWARE to register your PEM.
- PKWARE will generate an authorization file and send it back to you.
- Click Import Authorizations and specify the location of the authorization file.
Importing an Isolated Server License
As with the registration code, PKWARE will provide a license key to permit your company to use PK Protect (Server and Client). To install this code and make PK Protect operational, follow the below steps:
- Copy the license text.
- Go to Advanced > Licenses.
- Click Import License.
- Paste the license text into this page.
- Click Save to save the license details else click Cancel.
The license will appear under Active Licenses.
Note: Regardless of whether you choose Online or Isolated account, Internal users can always exchange Smartkey-encrypted files with each other. Depending on the policies set, internal users can also exchange data encrypted with passphrases or public keys.
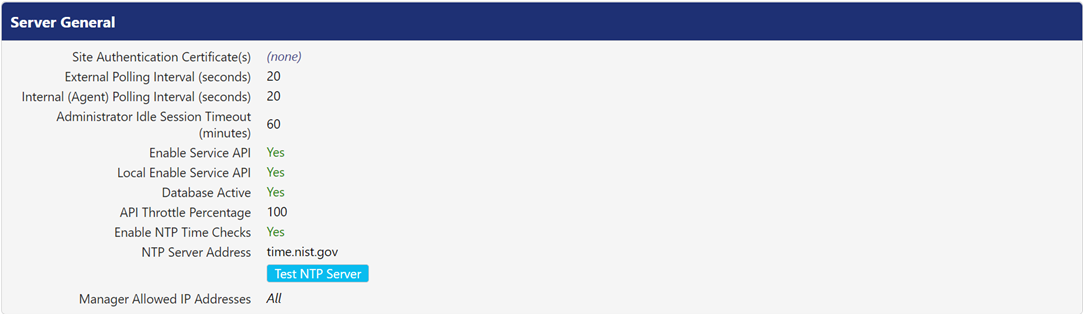
Server General
Using this panel, you can configure settings that control client activities and can define how PEM interacts with its ecosystem.
Following is the description for configurable settings:
Setting | Description |
Site Authentication Certificate(s) | This field allows you to upload certificate(s) for site authentication. The certificate uploaded here gets bundled to the TDE installer. This allows the TDE agent to trust that certificate. |
External Polling Interval (seconds) | This field displays time interval (in seconds) that the PEM connects to the PK Protect Cloud to receive changes. The default value is 60. Click the value to edit the interval. |
Internal (Agent) Polling Interval (seconds) | This field displays time interval (in seconds) that the PK Protect Agents connects with PEM for changes. The changes can include new Smartkeys, new policy changes, or account access changes. The default value is 20. Click the value to edit time interval. |
Administrator Idle Session Timeout (minutes) | This field displays the time (in minutes) after which PEM automatically logs out an idle administrator's session. The default value is 60. Click the value to edit the time interval. |
Enable Service API | It may be necessary to have PEM online but not accessible to clients. An example is when migrating servers or performing component upgrades. When set to No, only connections from the system are accepted; external web requests will be rejected. This setting applies to all the PEMs in a cluster. |
Local Enable Service API | It may be necessary to have PEM online but not accessible to clients. An example is when migrating servers or performing component upgrades When set to No, only connections from the system are accepted; external web requests will be rejected. This setting only applies to the PEMs on which it is set. |
Database Active | This setting is used for troubleshooting the PEM. When the value for this field is set to No, database access is suspended for some time. All current users are logged out and only local administrator accounts are available. |
API Throttle Percentage | This field displays the percentage of agents allowed to log into PK Protect. Use this setting during troubleshooting when extreme load is preventing administrators to connect with PEM. |
Enable NTP Time Checks | This setting is used to enable or disable the Network Time Protocols (NTP) checks. |
NTP Server Address | This setting allows you to enter the NTP time server credentials. Click the Test NTP Server button to test the connectivity to the defined NTP time server and get the desired time details. |
Manager Allowed IP Addresses | This setting allows you to enter the IPv4 addresses and ranges for whitelisting. |
Mail Settings
PEM can be configured to provide email notifications to manage Smartkey access requests and receipts. To setup email notifications, configure the Mail Settings.

Following is the description for settings.
Setting | Description |
Enable TLS | Enable this setting if you want to use TLS to secure the email messages. The default value is No. |
Server Hostname | Enter the hostname of the mail server. |
SMTP Port | By default, the value for this setting is 25 unless TLS is enabled. |
Domain (Optional) | If the mail server requires authentication, enter the Active Directory (AD) Domain. |
SMTP Username (Optional) | If the mail server requires authentication, enter the AD username. |
SMTP Password (Optional) | If the mail server requires authentication, enter the AD user password. |
From Address | Enter the information you would like to appear in the ‘From:’ line, when an email is sent by PEM, containing the log reports. |
System Event Recipients | Enter the email address(s) of the recipient(s) who will be notified when high priority errors occur within PEM. |
Billing Event Recipients | PEM periodically checks for license consumption usage. When the allocated license count reaches its limit, the system stops distributing new licenses to agents and PEM will notify the recipient(s) entered in this field. |
Once mail server settings are configured, click Send Test Mail button to verify that everything works.
Memcached Settings
In large environments, it is recommended to run different PEM application servers behind a load balancer. Using a load balancer will help the system scale to handle more HTTPS traffic from the clients in the organization.
Memcached is required when using more than one PEM in an application server cluster. When it is configured, Memcached will store data, instead of in-memory available on single PEM. It can be configured to be accessed from multiple application servers to create a shared cache pool. This type of configuration is for large-scale deployments where the PEM would be needed to serve 100,000 clients throughout an organization.

Following is the description for configurable settings.
Setting | Description |
Enable | If the value is set to Yes, Memcached is enabled. If the field is set to No, Memcached is disabled. Enabling Memcached is only required if more than one PEM is in your cluster. |
Server:Port # | This is a combination of the server address and the port where Memcached is installed and running. It is important to verify that PEM has the correct ports opened through any possible firewall. Click the editable fields in this option to add or edit a Memcached server. |