The Classification page allows for deployments of classification configurations to existing Smartcrypt agents by specifying the configuration, user, group, classification policy, and classification configuration. Classification configurations are can be created and exported from the Classifier Administration console. There are two tables on the classification page. This page is only applicable to Smartcrypt clients on Windows running on version 15.8 and above. This functionality is not supported for users on VDI.
How To Setup Classification Policies
Use the references in the page to follow the steps below.
Create a classification configuration in Classifier Administration using the PDF guides supplied with the software
In Classifier Administration, click in top root Classifier Administrator on the left hand side of the application
Click Publish Configuration on the right hand side under "Actions"
Select a local file store to store the classifier configuration
Give a reason and name for the publication
In Windows Explorer, navigate to the root folder of the newly published classification configuration
Select the three folders under the root classification configuration and compress them into one zip: Label Configurations, Management, Messages
Take this newly created zip configuration, upload it to the Archive >Classification >Configurations >Add page to save it in the Smartcrypt Enterprise Manager
Go to Archive > Classification >Policy. Click Add and fill out the form:
Name: Give a name of the policy
Classification: Declare the AD names/groups to be associated with this classification policy
Configuration: Select the newly uploaded zip configuration from the dropdown
Label Configuration: Give the string of the underlying label configuration name. This string can be found in Classifier Administration directly under "Labeling Configurations" with a gear icon beside it
Policy Configuration: Give the string of one of the policies created under the "Policies" folder in Classifier Administration
Options: Checking, "Classifier Tooltip" will present the classification of a classified zip file instead of the Smartcrypt icon
Plugins: Checking the options under plugins will allow for classifier add-on's to operate in the MS Office applications
Click Save
The classification configuration will be deployed out to the declared users. Office add-ins will be able to retrieve the newest classification configuration. File Classifier will retrieve the latest configuration after windows.exe is restarted.
Policies
The Policies table displays
Column
Definition
Order
Order in which classification policies are carried out. If a user/group is included in one or more policies, only highest ordered starting from one will be applicable.
Name
Unique name for the classification policy
Users/Groups
Users and groups from active directory that are assigned to the classification policy. You can use 7361946 to identify these.
Configuration
Zip file chosen for the policy that is uploaded in the configurations table
Label Configuration
Name of the Label Configuration from Classifier Administration.
Configuration Policy
Name of the Configuration Policy from Classifier Administration.
Updated At
Record of the last edit of the policy from the Smartcrypt Enterprise Manager
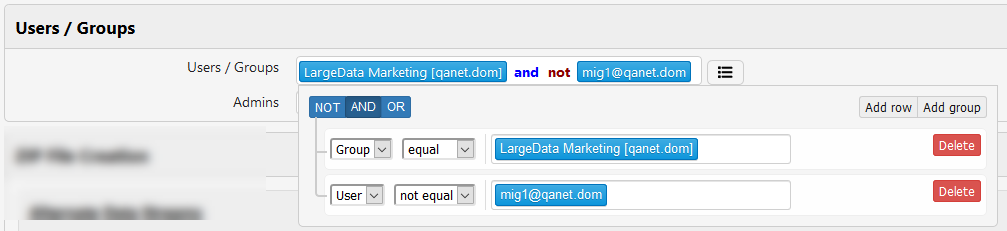
Advanced Definitions of Users and Groups
Admins can use Boolean expressions to identify people and groups that expand beyond the limits of standard Active Directory Groups. You can select multiple users and groups, exclude some users with the NOT operator, and add other users
In this example, the LargeData Marketing group is the Group that this policy applies to, but the group excludes user mig1@qanet.com.
To generate this result:
Click in the Users/Groups field to display your options. The icon changes to .
Start typing the name of the User or Group to apply this policy to. Smartcrypt Enterprise Manager will display a list you can select from.
Click Add Row.
In the left-most field, change to User.
To exclude a user, change the second field to not equal.
Start typing the user name and select the user you want to exclude from this policy.
At the top, change the Boolean operator. By default, the OR operator is selected. Change this to AND.
Click outside the box to confirm the changes.
Adding a Policy
Column
Definition
Order
Order in which classification policies are carried out. If a user/group is included in one or more policies, only highest ordered starting from one will be applicable.
Name
Unique name for the classification policy
Users/Groups
Users and groups from active directory that are assigned to the classification policy, You can use 7361946 to identify these.
Configuration
Zip file chosen for the policy that is uploaded in the configurations table
Label Configuration
Name of the Label Configuration from Classifier Administration.
Configuration Policy
Name of the Configuration Policy from Classifier Administration.
Reporting
Check Report Classification Actions to include in DSI Events
Reporting Interval (minutes)
How often SEM should check for Classification events. Default: 5 minutes
Events
Type in the Classifier events to record and report on
Excel
If this box is unchecked, it will disable the email and office classifier in Excel
PowerPoint
If this box is unchecked, it will disable the email and office classifier in Powerpoint
Word
If this box is unchecked, it will disable the email and office classifier in Word
Configurations
Column
Definition
Name
Arbitrary name that is associated with the zip file
Zip
The name of the uploaded classification configuration archive
Note: This archive must contain the "Label Configurations", "Management", and "Messages" folders at the root of the archive
JavaScript errors detected
Please note, these errors can depend on your browser setup.
If this problem persists, please contact our support.
.png)