.png)
MFA (Multi-Factor Authentication)
Multi Factor Authentication (MFA) is an authentication method that compels the user to provide two or more factors of authentication to gain access of a resource. MFA is core component of a strong Identity and Access Management (IAM) policy.
To prevent attacker from accessing PK Protect data multi-factor authentication can be used in addition to a user’s Active Directory account password and email address. The PK Protect supports two methods of MFA i.e., smartcard/X.509 certificate and Time-Based One Time Password (TOTP).
In TOTP, user connects to a device through a tool like Google Authenticator. The authenticator provides a code for limited time that user needs to enter. This timing prevents an attacker from brute-forcing by the help of a code.
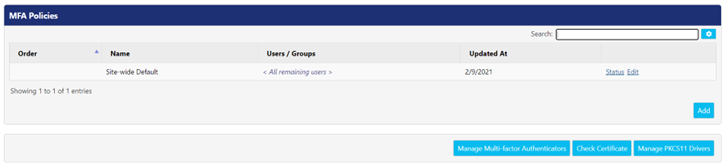
To access MFA, go to Identities > MFA.
MFA Policies
A list of existing MFA policies, including Site-wide Default policy appears on the MFA Policies panel. The Site-wide Default covers the users and groups which are not defined in another policy.
For existing MFA policies, the following actions can be performed:
- Edit - Click this button to edit the details of a policy. You cannot edit the details of the name field for Site-wide Default policy.
- Delete – Click this button to delete the policy.
- Status – Click this button to view the list of all devices which are associated with the policy. On clicking, it redirects to the Device screen that can be accessed via Archive > Devices.
Adding an MFA Policy
To create new user MFA policy, click Add button and configure following settings:
1. General Settings
- Enter the name of the policy in the Name
- Enter the name of the users or groups in Users/Groups field to apply this policy. You can make use of Advanced Definitions to identify the user and groups.
2. MFA Requirement
The following sections allow administrators to define the elements of how and when MFA will be required.
Require MFA – Selecting this checkbox will enforce MFA for the users defined in the policy and will reflect the settings defined in the following sections.
Settings | Description |
Notify user to add MFA | This setting reminds a user who has not setup a second device with TOTP yet. PEM cannot create a TOTP connection. |
Account Transfer | When a user signs into a new device (desktop or mobile), or after a password change on any device. |
Login | When a user logs in on a previously registered device. If the policy is set to Server, users cannot login offline. |
Encrypt/Decrypt | When a user attempts to open a PK Protect file or creates a new encrypted file. |
Modify MFA Setting | This setting requires MFA authentication, before an end user can modify their MFA settings, like the devices that are paired to their account. If this option is turned off, a potential attacker could access someone's account by stealing their credentials and register a fraudulent MFA device. |
For each MFA settings there is a ‘Mode’ and ‘Grace Period’
Mode – Defines the location where the MFA validation is executed.
- Server – The server will be used to validate the MFA token, this applies to both TOTP and certificate based authentication.
- Client – The client will locally valid the MFA token through proof of a digital signature.
- Either – The server or client will authenticate the MFA token; depending which method is available and/or is able to perform the authentication first.
- Off - The associated setting for MFA is disabled.
Grace Period – This defines a period of time (in seconds) that subsequent activities can be completed, without requiring the end user to MFA again. Different grace periods can be defined for each MFA setting.
3. Certificate Settings
If you want to use certificate-based authentication through smartcard or other means, check the Allow Certificate-based Authenticator checkbox. These settings control how to implement and control the interactions with the digital certificate.
Settings | Description |
Subject Filter | Enter a unique subject value. Using this value, the Agent will search for the keys. |
Issuer Filter | Enter a unique issuer value. Using this value, the Agent will search for the keys. E.g., CN = pkware-WIN-155FGEW-CA, DC = pkwarein, DC = com |
Ignore Time Limits | If this setting is enabled, then PEM will skip checking for expiration date and time nesting on certificates. |
Match Certificate to User | By default, this setting is selected. The PEM enquires Active Directory (AD) for user’s UPN and email address. |
Match UPN | If this setting is selected, PEM enquires the AD for user’s UPN and accepts the certificate, if UPN in the certificate matches. |
Match Email | If this setting is selected, PEM enquires the AD for user’s email address and accepts the certificate, if email address in the certificate matches. |
Custom Messages | This message is displayed when no certificate-based authenticator is connected to PEM. Admins can customize the message in this field when certain circumstances exist. If this field is left blank, it will deliver the default message in that situation which is ‘No Certificate Pairs are installed’. |
4. TOTP Settings
Select Allow TOTP Authenticators to allow users to use a Time-Based One Time Password (TOTP) token. Admins can customize the message displayed to users when certain circumstances exist. If Custom Message field is left blank, it will deliver default message in that situation.
Custom Messages | Description |
Prompt for TOTP | Add a TOTP code in this field. |
No Pairs – Can Create | Not currently used |
No Pairs – Cannot Create | The PK Protect mobile app installed on iOS and Android displays this message if user login. It uses it as a certificate for authentication. |
Click Save to make the changes effective or click Cancel.
Setting up Multi-Factor Authentication- For End Users
After an admin creates MFA policies, end users must configure their account to operate using MFA. The steps required vary for different operating system platforms, click the links below to access the setup instructions for your particular operating system.
Managing Multi – Factor Authenticators
An admin can delete an existing device from the MFA screen if device is lost or stolen. The Manage Multi-Factor Authenticators feature helps an admin to search for the system user. In turn, PEM displays a list of all MFA authenticated devices for this user.
Follow the below steps to search for system user:
- Click Manage Multi-Factor Authenticators The screen is redirected to Manage Multi-factor Authenticators panel.
- Search the system user by entering their email address or name.
- Click Lookup This will list down all the MFA authenticated devices for the user.
- Click Close button to go back to MFA screen.
Following is the description of the columns:
Fields | Description |
Name | Displays the name of the authenticator. |
Enabled | Specifies whether the device is in ‘enabled’ or ‘disabled’ state. This setting works as a toggle, so if it shows ‘enabled’, click to disable it; if it shows ‘disabled’, click to enable it. |
Kind | Specifies whether the authenticator is a certificate or TOTP based MFA. |
Updated At | This field display the date when the device was last authenticated. |
Delete | Click delete button if you want to remove the device permanently. |
Check Certificate
This feature allows the admin to confirm whether a user certificate is registered with PEM and complies with the default Site-wide policy. To check the certificate, follow the below steps:
- Click Check Certificate The screen is redirected to Check Certificate panel.
- Enter the existing user information in Fill User Info field or upload a certificate in Choose Cert File field which you want to test.
- Enable the Check if acceptable to create MFA Pair option if you want to confirm whether the certificate file will work to authenticate a device.
- Click Submit button to test the Universal Principal Name (UPN), email address, serial number and matches the assigned policy.
If the result is successful, then it returns the user’s UPN, email address, serial number and assigned policy.
Manage PKCS11 Drivers
The Public Key Cryptography Standard (PKCS) #11 defines the interface which is used for communication between SSL and PKCS11 modules. Users must setup a PKCS11 configuration before using PEM with MFA. Since the locations of the PKCS11 libraries vary, therefore PEM lets you define commonly used locations. The PK Protect Agent fetches the list from the PEM and look for the appropriate PKCS11 libraries when setting up an MFA.
To setup PKCS11 configuration, follow the below steps:
- click Manage PKCS11 Drivers This redirects the screen to PKCS11 Drivers panel.
- Enter the name of the label in Label
- Enter the platform.
- Enter the architecture in the Architecture
- Enter the path in the Path field where PKCS11 Driver is kept.