.png)
Policies
Policies
System administrators must establish effective data encryption policies. PK Protect policies, defined on this tab, are responsible for controlling the end user experience, configuring, and locking program options and most importantly, specifying administrative policy keys for use by Audit, Discovery, and Data Loss Prevention (DLP) people, processes, and technology.
Each client device's agent application checks in with the PEM Administrator at a standard (configurable) interval. When the client checks in, PEM Administrator applies any policy changes. Policy order on the Policies page is important; the client agent processes the Policies list from the top down. The agent uses the first one that applies to its particular user. Each policy has a defined scope of users that it applies to. When group policies are applied to a client, those policies always override the site-wide policy. If no policy is defined for a particular user, they will receive the site-wide-default policy.
For example, let's say you want to define a policy that applies to your Admin group, composed of one person from each of your departmental groups (Sales, Executive, Marketing, IT). When you add a new policy, it assumes the top position. For the Admin group policy to be applied to those departmental representatives, you should define the departmental policies first. Otherwise, you can adjust the processing order by dragging policies Up or Down in the Order column. The Site-wide Default policy cannot be re-ordered.
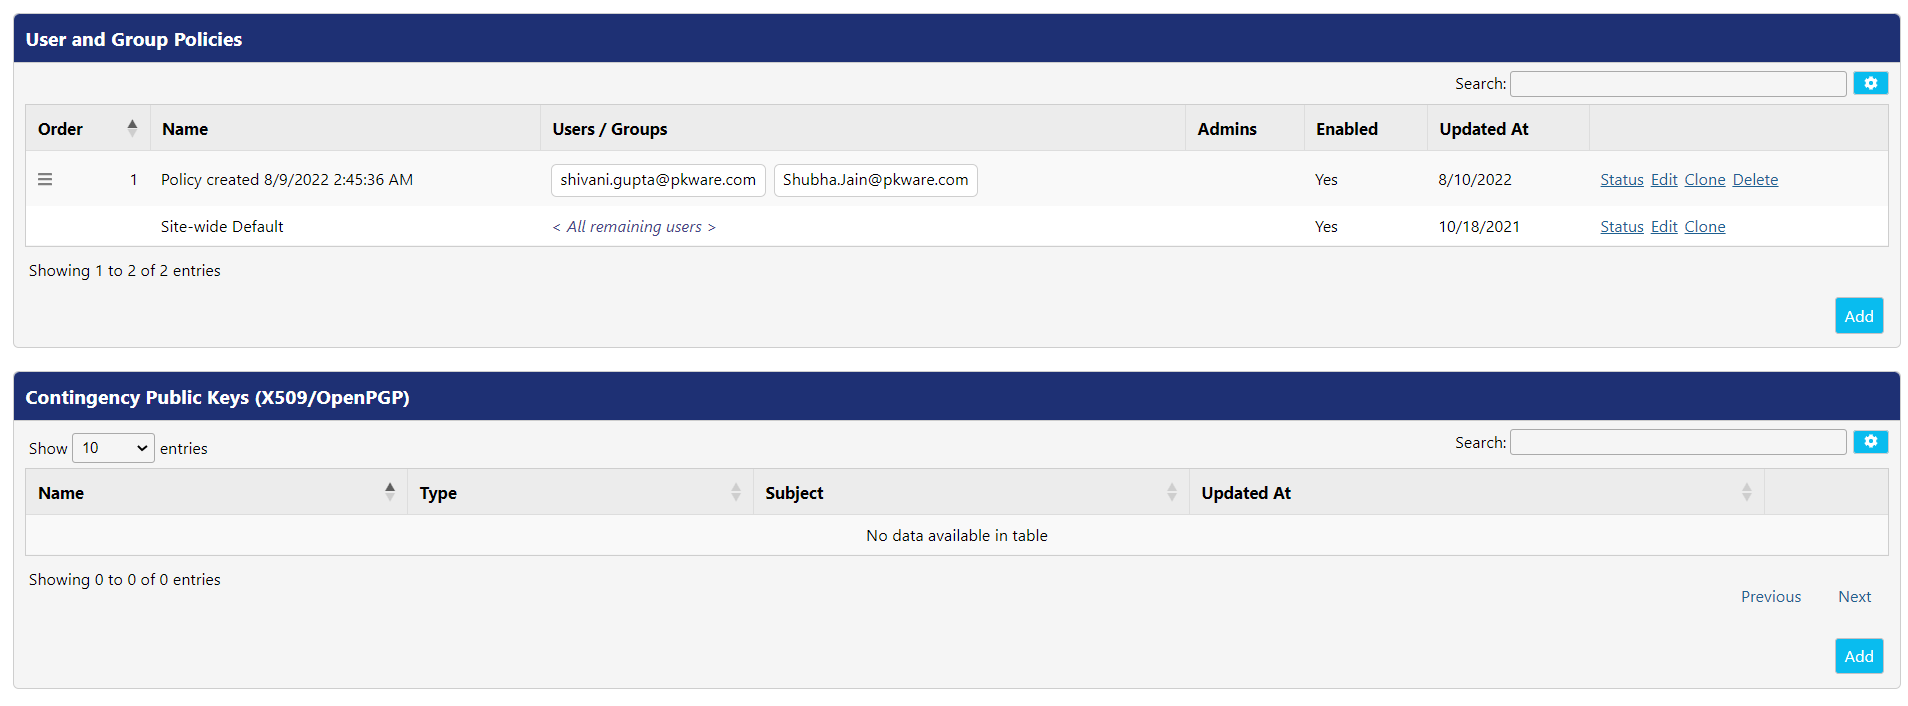
User and Group Policies
Most policy controls will have four drop-down options:
| Settings | Description |
|---|---|
| Allowed (default on) | Option is end-user configurable, and its default state is on. |
| Allowed (default off) | Option is end-user configurable, and its default state is off. |
| Required | Option is not end-user configurable and has been locked on. |
| Disabled | Option is not end-user configurable and has been locked off. |
When creating a new policy, certain sections have default settings, which are listed in the table below:
| Section | Control | Default Setting |
|---|---|---|
| Integration | Save changes as soon as possible | Allowed (default on) |
| Alternate Data Streams | Store Alternate Data Streams | Allowed (default off) |
| Encryption | Allowed (default on) | |
| Encryption | Passphrase | Allowed (default on) |
| Encryption | Smartkeys | Allowed (default on) |
| Encryption | Certificates | Allowed (default on) |
| Signing | Allowed (default on) | |
| OpenPGP File Creation | ASCII Armor | Allowed (default off) |
| OpenPGP File Creation | Encryption | Allowed (default on) |
| OpenPGP File Creation | Encryption Passphrase | Allowed (default on) |
| OpenPGP File Creation | Encryption OpenPGP Key | Allowed (default on) |
| OpenPGP File Creation | Sign Files Creation | Allowed (default on) |
| Outlook Plugin Behavior Settings | Exclude Email Signatures | Allowed (default on) |
| Outlook Plugin Behavior Settings | Prompt Before Zipping | Allowed (default on) |
| Outlook Plugin Behavior Settings | Auto-search Recipients | Allowed (default on) |
| Outlook Plugin Behavior Settings | Include Unzip Instructions | Allowed (default on) |
| Outlook Plugin Behavior Settings | Sign Attachments | Allowed (default off) |
| Outlook Plugin Behavior Settings | Re-Encrypt Attachments | Allowed (default on) |
| MacOS Policy Settings | Automatically open extracted items | Allowed (default on) |
| MacOS Policy Settings | Delete file(s) on encryption | Allowed (default on) |
| MacOS Policy Settings | Delete archive on decryption | Allowed (default off) |
Defining a Policy
To define a policy, click Add button and following settings need to be configure:
General Settings
Following settings specify how often clients will connect with the PEM Administrator, for different purposes. The following options are available:
General Configurations
| Fields | Description |
|---|---|
| Name | The name of the policy (typically referring to the users or groups it will be assigned to). If you don't name the policy, PEM will describe the Policy with a date and timestamp. *Note: You cannot edit the name of Site-wide Default policy. |
| Authentication Check Interval (minutes) | This specifies in minutes, how often an agent re-authenticates with the PEM Administrator. By default, value is set to 15 minutes. |
| Offline File Format | PEM Agents cache encryption keys they have access to, for the system on which they run. If agent loses connection with PEM Administrator (or instance user’s AD account has been disabled and agent can no longer log in), the number in this field specifies the maximum time (in hours) the agent will keep keys before it automatically purges them from the device. By default, the value is set to 24 hours. *Note: Keys will be re-synched when device is successfully re-authenticated. |
| Mobile Format zip | The drop – down displays the file format that will be used when zip files are created on mobile. Zip and Zipx are the supported formats. |
| Allow Mobile App Access | This option enables or disables the ability to use PK Protect for iOS or Android platforms for specific set of users defined in policy. By default, this option is enabled. |
| Authority Information Access Certificate Chain Retrievals | By default, this option is enabled. |
| Reset Client Defaults | Enabling this option will reset settings in existing policy on any PK Protect client device before applying this new policy. It can be used in combination with mobile file format to set the client device to default settings to use the zipx file format instead of zip. |
| FIPS | FIPS is an abbreviation for Federal Information Processing Standards, a set of standards for information processing in federal agencies in the United States. In FIPS 140 mode, encryption and decryption are done using only encryption and hashing algorithms that have been validated for compliance with FIPS 140-2 security requirements for cryptographic modules by NIST (National Institute of Standards and Technology), a branch of the US government. Click your preferred FIPS compliance options. Your selection will turn a bright blue; this is the default for clients that this policy applies to. The site-wide policy by default displays all the options, allowing clients to change from the default. To enforce just one selection (such as Use FIPS 140 Mode), delete the remaining options. *Note: FIPS mode is not supported for MacOS X platform. The following FIPS settings are available:
|
- Integration Settings:
Following settings are available to configure the behavior of integrations with other applications:
| Settings | Description |
|---|---|
| Auto Open single-document types | If a user receives a ZIP archive with a single file in it, often they want to open and read the zipped file without having to manually extract (decompress) it first. With the Integration settings, an admin can define a set of file extensions that will automatically open in native application. A default set of extensions, including Microsoft Office files, PDF, and graphics files. |
| Save changes as soon as possible | By default, when someone opens a single-file ZIP archive, the ZIP container stays open until the file is closed. If the user makes changes to the file, the archive container doesn't record the change until the file is closed and returns to the container. Use the drop-down menu to change the policy to allow users to edit documents and update the archive. If your policy allows this feature, client Office Integration settings will display this option; the user can turn this on or off. If your policy requires the feature, the setting will be checked; the user cannot change this. If your policy Disables the feature, the setting will not display in the client. *Note: if user continues making changes in the file while PK Protect is saving the previous changes, the data in the zip archive can get corrupted. It is always safer to enable the default behavior. |
| File Collaboration Options | This option allows user to set priorities when single-file ZIP archives are auto-opened and accessible to anyone.
*Note: If Save changes as soon as possible and Collaboration Mode are both enabled, it's possible that two separate versions of the same document may exist. That is, User #1 opens DocumentX.docx, and while that document is being edited, User #2 opens DocumentX.docx, edits the same section. Both users save the document into a ZIP archive. User #3 might not know which wording is correct. |
| Enable Microsoft Word Plugin | This option allows you to view the PK Protect menu items in the MS Word Plugin. |
| Enable Microsoft Excel Plugin | This option allows you to view the PK Protect menu items in the MS Excel Plugin. |
| Enable Microsoft Powerpoint Plugin | This option allows you to view the PK Protect menu items in the MS Powerpoint Plugin. |
Users/Groups
The users and groups entered in this section are those to which the policy applies.
| Setting | Description |
|---|---|
| Users/Groups | This field contains the list of Active Directory (AD) users and groups to which this policy should apply. *Note: If a user is defined in more than one policy, the first one in the policy list will be applied. |
| Admins | This field contains the list of Active Directory (AD) users and groups that are allowed to control and modify this policy. *Note: If a user is defined who is not Sys Admin, then this user will be added to the PEM Admins list and configured as Sys Admin. |
Zip File Creation
To set encryption and signing policies for creating zip archives, configure the following sections:
- Alternate Data Streams
A file is a stream of data stored on a hard drive. When you open a file, the stream takes up space in a computer's memory. On modern Windows computers, using the NTFS file system an individual files can contain multiple data streams. The content of a file is one data stream, but the same file can contain one or more alternate data streams. In the relatively rare instance, an alternate stream is created it usually contains additional information about a file.
For example, when Internet Explorer downloads a file from the Internet, it adds an alternate stream noting that the file originated outside the local network. PK Protect always retains this stream in archives. These streams are not common but can add size to a file.
| Settings | Description |
|---|---|
| Store Alternate Data Streams | This will preserve the alternate data stream of a file during compression. By default, Allowed (default off) is selected. |
| Restore Alternate Data Streams | This will restore the alternate data stream of a file when extracting. By default, None is selected. |
- Encryption -
Administrators can choose whether to require every zip archive to be encrypted, and whether to allow users to skip encrypting files on a case-by-case basis. By default, Allowed (default on) is selected.
| Settings | Description |
|---|---|
| Algorithms | This field display the list of algorithms that can be used for encryption zip archive. PK Protect supports AES in several key lengths as well as AE2 (256-bit) and 3DES (168-bit). By default, PK Protect uses the strongest available algorithm and key length (AES-256). |
| Passphrase | This setting allows you to control whether passphrase-based encryption is allowed. By default, Allowed (default on) is selected. |
.
- Smartkeys
By default, Allowed (default on) is selected In addition to the basic usage settings, the following options are available when Smartkeys are allowed
| Settings | Description |
|---|---|
| Allow users to create Smartkeys | Users can create and define recipients of Smartkeys. By default, this option is enabled. |
| Allow users to delete Smartkeys | Users can delete Smartkeys which they have created. By default, this option is disabled. |
| Allow encryptions with user's private Smartkey | Users can encrypt data with a private Smartkey issued with an account. By default, this option is enabled. *Note: Files encrypted with private Smartkeys cannot be decrypted by contingency keys or contingency group members. |
| Allow encryption using Smartkeys owned by other individuals (besides community keys) | Users can encrypt data with a Smartkey owned by another user. By default, this option is enabled. *Note: Another User may be a PK Protect user outside of your organization. |
| Allow users to copy Smartkey passphrase | Smartkeys automatically contain a passphrase. By default, this option is enabled. If users share Smartkey-encrypted files with non-PK Protect users, this option allows those users to access the Smartkey passphrase and allow the recipient to open the encrypted file. |
- Certificates
By default, Allowed (default on) is selected. If you allow users to employ Public Key Encryption in addition to Smartkeys, check the appropriate settings to configuration these options.
| Settings | Description |
|---|---|
| Allow X.509 certificates | Users can encrypt the data using X.509 personal certificates. |
Allow OpenPGP Keys | Users can encrypt the data with the help of OpenPGP keys. |
| Perform Strict Checking | Strict checking identifies certificates that are valid and designated for encryption. Following options are enabled when you select this option:
For example, if the issuer certificate is valid from February 1, 2015, to January 31, 2018, the date range during which the selected certificate is supposed to be valid does not begin before February 1, 2015, or end after January 31, 2018. |
| Filter Issue (CN) | If you wish to see only those certificates which are created by a specific certificate authority, type the issuer's name in this field. This information can be found in the Details tab of Certificate Properties. Look for the Issued by section in the Details tab, and type everything after CN=in the field For example, if all your company's certificates are issued by COMODO, type (no quotes) "COMODO Client Authentication and Secure Email CA" in the field. |
| Filter Issue (OU) | If you wish to see only those certificates which are issued to someone in a specific organization, type the complete Organizational Unit (OU) name in this field. This information can be found in the Details tab of Certificate Properties. Look for the Issued to section in the Details tab, and type everything after OU= in the field. For example, if all your company's certificates have an OU of Corporate Secure Email, type (no quotes) "Corporate Secure Email" in the field. |
| Check certificate revocation | This option causes PK Protect to warn if a selected certificate’s signature appears on an accessible list of certificates that have been revoked. When Strict Checking option is turned on, PK Protect does not use a revoked certificate. To use this option, you must download a list of revoked certificates from a certificate authority. |
- Signing
By default, Allowed (default on) is selected in the drop-down. Following settings need to Configure:
| Settings | Description |
|---|---|
| Signature Algorithm | The signature algorithm creates a hash value for the file to be signed. The hash value uniquely represents the file: any change to the file gives it a different hash value. Comparing the hash value of the file when it was signed with the file's current hash value reveals whether the file has been changed. PK Protect uses the SHA2 hash algorithm at 256-bit strength by default. Stronger versions (384- and 512-bit) of SHA2 are also available. Click the button to approve the use of either of these algorithms. Note: You may allow the use of the MD5 or SHA1 algorithms by clicking in a blank space on this line. These algorithms are deprecated for signing keys, and not recommended. |
| Perform Strict checking | Strict checking identifies certificates that are valid and designated for encryption. To learn more, refer to Perform Strict Checking. |
| Filter Issue (CN) | If you wish to see only those certificates which are created by a specific certificate authority, type the complete issuer's name in this field. This information can be found in the Details tab of Certificate Properties. Look for the Issued by section in the Details tab, and type everything after CN= in the field. For example, if all your company's certificates are issued by COMODO, type (no quotes) "COMODO Client Authentication and Secure Email CA" in the field. |
| Filter Issue (OU) | If you wish to see only those certificates which are issued to someone in a specific organization, type the complete Organizational Unit (OU) name in this field. This information can be found in the Details tab of Certificate Properties. Look for the Issued to section in the Details tab, and type everything after OU= in the field. For example, if all your company's certificates have an OU of Corporate Secure Email, type (no quotes) "Corporate Secure Email" in the field. |
| Check certificate revocation | This option causes PK Protect to warn if a selected certificate’s signature appears on an accessible list of certificates that have been revoked. When Strict Checking option is turned on, PK Protect does not use a revoked certificate. To use this option, you must download a list of revoked certificates from a certificate authority. |
Check certificates revocation when verifying | This option allows you to check whether an X.509 certificate has been revoked that has been used to sign or encrypt any file in the archive or the archive itself. |
| Allow Archive Spitting | Enabling this option gives users the ability to take a zip file and spilt it into many zip files which together make the original zip file. |
OpenPGP File Creation
If you want to allow client to create OpenPGP files, check Allow OpenPGP File Creation checkbox. Following settings appear:
| Settings | Description |
|---|---|
| ASCII Armor | ASCII Armor (also known as Radix-64) is a character format that creates an ASCII character stream that could be used in transferring OpenPGP files through transport mechanisms that can only handle character data (for example, email body text). By Default, Allowed (default on) option is selected. |
| Encryption | This option allows users to create OpenPGP files and disable encryption. By default, Allowed (default on) option is selected. |
| Algorithm | PK Protect offers the choice of the algorithms shown below. Different key lengths are supported for the Advanced Encryption Standard (AES) algorithm. In general, the longer the key, the stronger the encryption. Encryption also takes slightly longer in proportion to the length of the key.
|
| Passphrase | By default, Allowed (default on) option is selected. |
| OpenPGP Key | By default, Allowed (default on) option is selected. This allows OpenPGP keys to be used. |
| Sign Files | By default, Allowed (default on) option is selected. |
| Algorithm | By default, Pk Protect uses SHA2 Hash algorithms at 256-bit strength. Stronger versions, SHA2 (384-bit) and SHA2 (512-bit) are also available to be used for encryption. *Note: You can allow the use of MD5 or SHA1 algorithms by clicking in a blank space on this line. However, these algorithms are deprecated for signing keys and are not recommended. |
Passphrase Complexity
To secure passphrase-encrypted files, use passphrases that are long enough, and which are not easy to guess. An administrator can set requirements for both minimum and maximum passphrase lengths. To enable password complexity s, Check Enforce passphrase complexity rules checkbox.
For example, you can require a minimum passphrase length of 15 characters, or even 260 characters, instead of the default minimum of eight. Whenever user encrypts with a passphrase, PK Protect enforces the rules by rejecting any proposed passphrase that does not comply.
Following settings are available:
| Settings | Description |
|---|---|
| Minimum Length | The minimum number of characters that a passphrase must contain. Passphrases shorter than this are rejected. You can require a minimum length as large as 260 characters. By default, the length of passphrase is 8 characters. |
| Maximum Length | The maximum number of characters that a passphrase can contain. Passphrases longer than this are rejected. By default, the maximum length of passphrase is 250 characters. You can assign 260 characters as a maximum length. |
| Maximum Repeats | Sets the maximum number of adjacent, case-sensitive occurrences of the same character. A setting of 1 allows no repetitions. A setting of 2 allows two adjacent occurrences, and so on. A setting of 0 (the default) turns the option off and allows all repetitions. For example, a setting of 2 disallows a passphrase that contains aaa but allows aAa or a1a2a. |
| Minimum Lowercase | The minimum number of lower-case alphabetical characters a passphrase requires. The default value is set to 0 (zero). |
| Minimum Uppercase | The minimum number of upper-case alphabetical characters a passphrase requires. The default value is set to 0 (zero). |
| Minimum Digits | The minimum number of digits i.e., 0-9, a passphrase requires. By default, the value is set to 0 (zero). |
| Minimum Symbols | The minimum number of special characters a passphrase requires. By default, a special character is defined as a non-alphanumeric character. The default value is set to 0 (zero). E.g., @, #, $, %,',’, *, (,), ,_,-,+,=,{,},&,&,:, ;,<,>,/,\,`,~,!,",*,^,[,]. |
Contingency
Choose from a list of existing contingency keys associated with this installation. To define a contingency key, return to the Policies page and click Add New Contingency Key in Contingency Public Keys (X509/OpenPGP) panel. To learn more, refer to Contingency Public Keys (X509/OpenPGP).
This feature is used by companies to ensure that they never experience a situation where a user can encrypt a file, and once they leave organization and there is no one who can decrypt it.
| Settings | Description |
|---|---|
| Contingency Keys | This field allows you to specify the contingency keys that can be used for the decryption of files. |
| Enable Contingency Users | Enabling this option allows you to specify the contingency users. |
| Contingency Users | This field allows specific individuals to be defined, who will be able to decrypt information encrypted by the users in this policy. To enable this feature, select the Enable Contingency Users checkbox.
|
Email Settings
The PK Protect application on Windows has a plugin that can run to control encryption operations emails in Outlook. Check Enforce Outlook Integration checkbox to configure email settings in a policy. Following are the settings:
| Settings | Description | ||||||||||||||||||||||||
|---|---|---|---|---|---|---|---|---|---|---|---|---|---|---|---|---|---|---|---|---|---|---|---|---|---|
| Plugin Actions | This allows control on the default and available actions from the PK Protect Outlook Plugin. The default option displays in bright blue, Other allowed actions are displayed in a grayer blue; and admins can prevent certain functionality by not including them in the field. Following actions are taken on emails:
| ||||||||||||||||||||||||
| Extensions to Include | This field displays the list of file extensions that will be considered by PK Protect Plugin when performing ‘Compress Attachments Only’ and ‘Encrypt Attachments only’. E.g., If the policy is set to exclude ‘.pdf’ extensions and user performs an action by sending an email with PDF attachment. Following action is taken:
If user sends a ‘.png’ attachment instead of ‘.pdf’ then in that case following actions are taken:
| ||||||||||||||||||||||||
| Extensions to Exclude | This field displays the list of file extensions that will be ignored by PK Protect Plugin when performing ‘Compress Attachments Only’ and ‘Encrypt Attachments only’. E.g., If the policy is set to exclude ‘.pdf’ extensions and user performs an action by sending an email with PDF attachment.
If user sends a ‘.png’ attachment instead of ‘.pdf’ then in that case following actions are taken:
| ||||||||||||||||||||||||
| Exclude Email Signatures | If the option is enabled, text and picture signature element in the email body will not be included in the archive. It will be included in the plain text email. By default, Allowed (default on) option is selected in the drop-down. |
- Encryption Settings
These settings help in determining how Microsoft Outlook will encrypt the email message. Any changes made here to perform encryption with Smartkeys, X.509 certificates or passphrases, will apply to all Outlook messages regardless of how encryption behaves outside of email.
Certificates, Passphrase, PKWARE Identity, and Smartkey are the following options available in the Email Encryption Option field. The option selected in this field will be available for Outlook users. When you select any of the following options, these settings appear:
| Settings | Visibility | Description |
|---|---|---|
| Passphrase Instructions Prompt | This option is visible when Passphrase is selected in Email Encryption Options. | This option is visible when Smartkey is selected in Email Encryption Options. |
| Maximum Identities Per Server Lookup | This option is visible when PKWARE Identity is selected in Email Encryption Options. | Set a limit for how many recipients should be called up from each LDAP server. By default, the value is set to 25. |
| Maximum Identities Used Per Email | This option is visible when PKWARE Identity is selected in Email Encryption Options. | Check this checkbox to define one or more Community Keys to use if the initial search for recipients does not find a Smartkey. The Outlook plugin will select the first available Community Key. |
| Require passphrase entry for non-internal mail recipients | This option is visible when Smartkey is selected in Email Encryption Options. | Check this checkbox to define one or more Community Keys to use if the initial search for recipients does not find a Smartkey. The Outlook plugin will select the first available Community Key. |
Hide Smartkey selections when prompting for passphrase entry | This option is visible when Smartkey and Passphrase is selected in Email Encryption Options. | Check this checkbox to display the Passphrase entry prompt before showing available Smartkeys. |
Use pre-selected Smartkeys when auto-search for recipients fails to find a Smartkey | This option is visible when Smartkey and Passphrase or all three options are selected in Email Encryption Options | This allows you to require a passphrase for each message sent outside the organization. |
- Recipient Filtering
This setting allows user(s) to apply specific rules based on the mail being sent to. The Outlook Plugin scans the To, and Carbon Copy (CC) fields and mandate certain Outlook Plugin actions to occur based on recipients. To enable this setting, specify the email address to filter in the field next to the action you want done.
| Settings | Description |
|---|---|
| Email Body Encryptions | The email body is encrypted for the list of recipients specified in this field. |
| Encrypts Attachments | The attachments get encrypted for the list of recipients specified in this field. |
| Compress Attachments | The attachments are compressed for the list of recipients specified in this field. |
| Skip Actions | No action is performed on the emails for the list recipient(s) specified in this field. |
| Internal Mail Recipients |
- External Recipient Handling
These settings force users to take extra care when emailing people outside the organization. On checking Configure external recipient warning checkbox, following prompts are selected by default. These are:
*Note: Atleast one prompt must be selected to configure External Recipient Warning.
- Prompt user on emails to external recipients
- Prompt user on emails to external recipients with attachments
- Prompt user on meeting invitations to external recipients
- Prompt user on meeting invitations to external recipients with attachments.
When any of these checkboxes are enabled, you can configure how much information is included in the user prompt.
| Settings | Description |
|---|---|
Display Recipient Expand Limit | If a user mails the content to a list of external recipients subjected to the policy, PK Protect will display the list all email addresses, using which user can deselect individual recipients from processing. The admin can define a top limit of how many individual emails to display. With this setting, you can limit the number of list recipients to display. |
External Email Recipient Prompt Instructions | Enter the message you want to display when prompting the user. The prompts specify what a user can do next. You can use HTML tags for highlighting the message in the prompt such as bold, underlined and italic, line breaks, etc. |
Distribution Exemptions | If you’ve a large distribution list, such as an "All Employees" list, type the list address (such as AllEmployees@MyCompany.com) here to prevent PK Protect from displaying every name in the list. |
- Gateway Settings
To enable the Gateway settings Internal Mail Recipients setting must be configured in Recipient Filtering panel. Following settings need to be configured in Gateway settings panel:
| Settings | Description |
|---|---|
| Name | The name defined here will be shown to end users as a gateway option of where to send emails. As an example, we'll define the name as "Send from SecurityMail" The overall context provided to the end user will be shown as, "" Would you like to protect your message? Sensitive information detected in the following file(s): <Examplefile.docx> Button: Encrypt Attachments Button: Send from SecurityMail "" |
| Subject Prefix | Concatenation of email subject before the user's defined email subject. Example: If a user has a subject in their email as "ProjectXYZ" and a Subject Prefix is defined as "GATEWAY" the final string will be "GATEWAY ProjectXYZ |
| Subject Suffix | Concatenation of email subject after the user's defined email subject. |
| Header Tag Name | Define the x-header tag name for the .msg file. |
| Header Tag Value | Define the x-header tag value for the .msg file. |
Decrypt Attachments | If this option is checked, it prompts user to decrypt the attachment before it is sent. |
Send Mail via Gateway | If this option is checked, the rules above are applicable for sending emails. |
| Send Meeting Requests via gateway | If this option is checked, the rules above are applicable for sending meeting requests. |
- Content Filtering
The Outlook Plugin has some basic behaviors that trigger a different user experience. The same 4-state drop down options apply here as well (Allowed On, Allowed Off, Required, Disabled) to the following options:
| Settings | Description |
|---|---|
| Prompt Before Zipping | There is another dialog that the Plugin can open to select user-controlled options for PK Protect. This is useful when sending email outside of outlook (from a "send an email option" in other applications). By default, the Allowed (default on) option is selected. |
| Display Reason for Policy Based Encryption | Check this box to display a message when the policy forces encryption of a message. By default, this option is enabled. |
Add PKWARE header tag to email | Check this box to add an x-header tag to each email processed by the Outlook plugin. This is required when you want to differentiate PK Protect-processed mail from the rest of your email traffic. |
Allow conversion of Rich Text Format (RTF) messages to HTML | Check this checkbox to convert the message format from Rich Text Format (RTF) to HTML format. |
Auto-Search Recipients | Auto-Search Recipients will look at the Smartkeys that all recipients have access. If a Smartkey is not found, a new key can be created with all recipients included on the email message. By default, the Allowed (default on) option is selected. |
Include Unzip Instructions | PK Protect can include a plain text (non-encrypted) document with instructions on how to decrypt the attachment. Default: Allowed (default on). |
Instructions | Text added here will be provided in a text file that is sent out automatically when a user sends an encrypted attachment. This text can be plaintext or HTML formatted. *Note: This is not used when email body encryption is activated or when discovery filter override recipient filtering is not checked. |
Sign Attachments | The zip archive produced by PK Protect can be automatically signed with a digital certificate if present. By default, Allowed (default off) option is selected. |
Re-Encrypt Attachments | Users can change the encryption on existing zip archives attached to an email message. This option must be set if you want PK Protect to encrypt existing archives. By default, the Allowed (default on) is selected |
Default Zip Name | Using this option, you can give same generic name to all ZIP file attachments that contain multiple files. You can also define alternate three-character extension of the zip archives. Some networks have security settings that prevent file attachments with the zip extension from being sent or received. Use this feature if this is an issue for you and your recipients. When you zip a single attached file, ordinarily the ZIP file is named after the attached file itself. If the security option to encrypt file names is set, the generic name is always used. For example, if the attached file is employee_data.docx, PK Protect names the zip file employee_data.zip. *Note: This field accommodates for a .zipx entry, as an alternative to zip. |
Enable Recent Mode | If this option is checked, users can select ‘Recents’ from PKWARE tray icon in the Windows operating system. It displays the list of all messages that have been recently sent. |
Enable Sending Passphrase to Recipients | This checkbox is enabled when Enable Recent Mode is selected. If this option is checked, users can select a ‘Mail’ icon in ‘Recents’ dialog to prompt a new email with pre-selected recipients in the Bcc field and the passphrase is included in the body of the email. |
MacOS Settings
Check Configure macOS Policies checkbox to configure policy settings for MacOS. Following settings gets visible:
| Settings | Description |
|---|---|
| Extract file location(s) | By default, PK Protect extracts compressed files in the same directory as the original archive. If another file with the same name is kept in the same directory in Finder, the newly extracted file is added as a copy of the original file. This setting allows you to select a new default folder or be prompted for a destination folder each time you open an archive. Choose from these options:
|
| Extract email attachment location(s) | By default, PK Protect extracts compressed files in the same directory as the original archive. If another file with the same name is in that same directory in Finder, the newly extracted file is added as a copy of the original file. This setting allows you to select a new default folder or be prompted for a destination folder each time you open an archive. Choose from these options:
|
| File select action option(s) | This option defines what happens when user selects an archive. There are two options available:
|
| Automatically open extracted item(s) | When the user extracts file(s) from an archive, it gets open in the associated application. By default, Allowed (default on) option is selected. |
| Delete file(s) on encryption | When a file is encrypted, the unencrypted version of this file is removed from the system. By default, Allowed (default on) option is selected. |
Delete archive on decryption | When files are decrypted (encryption is removed), the encrypted archive is deleted. By default, Allowed (default off) option is selected. |
Contingency Public Keys (X509/OpenPGP)
Contingency keys enable an organization to decrypt files encrypted by anyone in the organization, whether the files were passphrase-encrypted or were encrypted for specific recipients.
Contingency keys are third-party OpenPGP or X.509 formatted public keys that will be automatically included in every encryption operation performed by PK Protect. These keys are generated outside of the PK Protect ecosystem in accordance with organization's security policy.
Whether the files are password-encrypted or encrypted for specific recipient public keys, contingency keys provide a safeguard to be sure that important information belonging to the organization does not become inaccessible because no one in the organization can decrypt it. Contingency keys must use RSA-2048 (or stronger) encryption.
*Note: When you need to open a file encrypted with a contingency key, be sure the private key is accessible.
Adding Contingency Keys
To add a contingency key to PK Endpoint Manager (PEM) for use in a Policy, follow the below steps:

- Click Addbutton in the Contingency Public Keys (X509/OpenPGP) panel. This opens New Contingency Key
- Browse system for the public key file by clicking Choose File
- Click Upload to upload the key to PEM.
- Click Cancel if you do not want to upload the key.