.png)
Windows Server: Installation and Setup Guide
Windows Server Installation and Setup
Overview
The purpose of this guide is to describe the environmental requirements and steps required to configure the PEM Administrator and associated PEM Agent.
What you will need:
A Windows Server to host the PEM Administrator. This server should be joined to an Active Directory domain.
A SQL Server or PostgreSQL 9.5 Database where PEM Administrator application data will live. Before installing you should obtain:
Database server instance name
Database name
Database username with access to the above database
Database user password
- The port the database server connects to
An SSL certificate that matches the hostname you wish to use for the PEM Administrator
(optional) A DNS record for "pkwareops.[domain.ext]" published into your internal/external DNS. The PK Protect application will look for this record by default.
- (optional) To test local search, install Java 11 (AdoptOpenJDK) and ElasticSearch
What this guide will cover:
- Scripted installation.
- SQL database requirements and setup.
- IIS website / application pool requirements and setup.
- TLS / SSL configuration and connectivity.
- Deployment of the PEM Administrator.
Active Directory Authentication Note:
Note
The Windows Server that will host the PEM Administrator site/application needs to have access to authenticate with your Active Directory. This authentication occurs over the standard Active Directory Domain Services protocols. For more information about ports that are needed for the Windows Server to have access to the domain, see: https://technet.microsoft.com/en-us/library/dd772723(v=ws.10).aspx
Windows Server Core Installations:
Looking for instructions for installing on Windows Server Core? We've got you covered here: 2022-10-06_05-51-19_Windows Server Core Installation and Setup Guide
Scripted Installation
Since v15.3, you have the option to perform a scripted installation of the PEM Administrator. Contact your PKWARE account representative to obtain the appropriate package for your platform.
Steps performed
The script performs the following steps, in order:
- Checks numerous system dependencies.
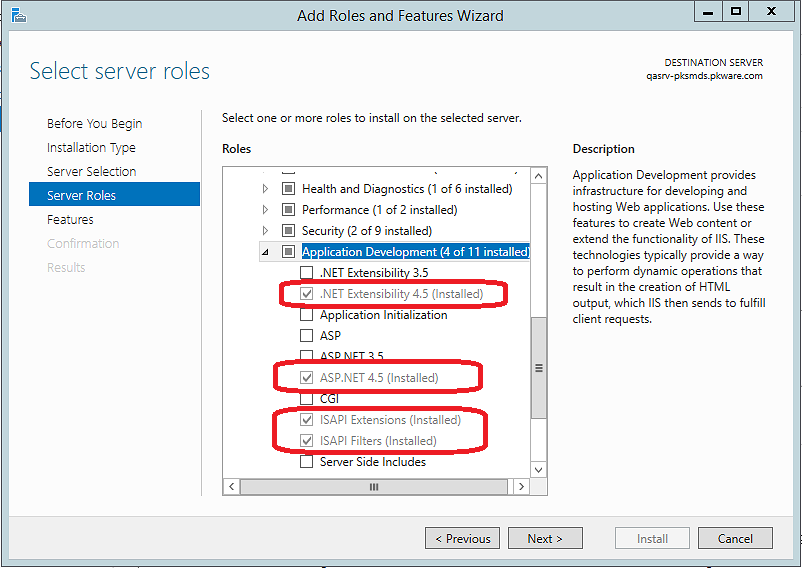
- Installs and configures appropriate Internet Information Services (IIS) Roles and Features.
- Allows the Administrator to select a database type for PEM Administrator. Choose from:
- A local database instance of PostgreSQL. The script will install and configure the database while prompting the Administrator to set a DB Instance Master password and DB access password.
- An external MS-SQL database which the script will later require information for (Hostname, Database Name, DB Username, DB Password).
- An external PostgreSQL database which the script will later require information for (Hostname, Database Name, DB Username, DB Password).
- Configures the PEM Administrator website and an associated Application Pool in IIS.
- Generates and binds a Self-Signed Certificate to the website.
- Prompts the administrator to supply a default encryption master password.
- Prompts the administrator to supply a default system administration account for the PEM Administrator.
Notes for the scripted deployment option:
- The use of the Self-Signed Certificate created during the scripted installation is intended for PK Protect use in lab or non-production environments for a proof of concept or evaluation purposes. To install a trusted, rooted or other certificate, please follow the steps below
To import a certificate in Windows 2012
- Open the Certificates snap-in for the local machine's certificate store: Start | Run | certlm.msc
- In the console tree, click the Personal store
- On the Action menu, point to All Tasks, and then click Import to start the Certificate Import Wizard.
- Type the file name containing the certificate to be imported. (You can also click Browse and navigate to the file.)
- This certificate should have a private key (PKCS #12 file)
- Type the password used to encrypt the private key.
- (Optional) If you want to back up or transport your keys at a later time, select the Mark key as exportable check box.
- Select Place all certificates in the following store, click Browse, and choose the Personal store.
- When this process is completed, a Hosts file (Windows/System32/driver/etc/hosts) or DNS entry, pointing directly to one or more IP addresses (an A record), will be required for client machines to connect back to the Manager.
Running the installation script
- Log in to the Windows Server environment and copy the SEM installation package to the Windows Server. Extract the .ZIP package.
- Run Microsoft PowerShell as an Administrator.
- Change to the directory location where you extracted the SEM installer.
- Execute
./sc_install.ps1. - Press R when asked "Do you want to run <
install.ps1>?
The system (if network connected) will attempt to download/install all Windows features required to run the SEM, including all prerequisite Microsoft Internet Information Server (IIS) modules and .NET Core Server.
PS C:\Windows\system32> cd C:\Users\jack_d\Desktop\SmartcryptMgrTDE-18.0.152PS C:\Users\jack_d\Desktop\SmartcryptMgrTDE-18.0.152> .\install.ps1Checking Prerequisites...Checked Prerequisites.Enabling IIS-WebServerRole...Enabled IIS-WebServerRole.IIS-WebServer is enabled.IIS-CommonHttpFeatures is enabled.IIS-DefaultDocument is enabled.IIS-HttpErrors is enabled.IIS-StaticContent is enabled.IIS-HealthAndDiagnostics is enabled.IIS-HttpLogging is enabled.IIS-Performance is enabled.IIS-HttpCompressionStatic is enabled.IIS-Security is enabled.Enabling IIS-WindowsAuthentication...Enabled IIS-WindowsAuthentication.IIS-ApplicationDevelopment is enabled.Enabling NetFx4Extended-ASPNET45...Enabled NetFx4Extended-ASPNET45.Enabling IIS-NetFxExtensibility45...Enabled IIS-NetFxExtensibility45.Enabling IIS-ASPNET45...Enabled IIS-ASPNET45.IIS-ISAPIExtensions is enabled.IIS-ISAPIFilter is enabled.IIS-WebServerManagementTools is enabled.IIS-ManagementConsole is enabled.Installing .NET Core 2.1.7 Server Hosting...Installed .NET Core 2.1.7 Server Hosting.Installing PostgreSQL
PEM Administrator supports Microsoft SQL Server and PostgreSQL 9.5 database management systems. The SEM installation script will prompt you to "install postgres to use later." Press enter to skip installation, or Y to install and configure PostgreSQL locally.
If you choose not to install PostgreSQL, it is assumed a remote database server will be used.
Below is the sample output from a basic installation. The installation script will also prompt for hostname. This is used to generate a self-signed certificate and set up the hostname and SSL bindings for the site that is created
Would you like to install postgres to use later?[Y] Yes [N] No (default is N): nExpanding Archive ("C:\Users\jack_d\Desktop\SmartcryptMgrTDE-18.0.152\pkmds-18.0.152.zip"->"C:\PKWARE\SmartcryptEnterpriseManager")...Expanded Archive ("C:\Users\jack_d\Desktop\SmartcryptMgrTDE-18.0.152\pkmds-18.0.152.zip"->"C:\PKWARE\SmartcryptEnterpriseManager").Expanding Archive ("C:\Users\jack_d\Desktop\SmartcryptMgrTDE-18.0.152\pkmds-tde-18.0.152.zip"->"C:\PKWARE\SmartcryptEnterpriseManager")...Expanded Archive ("C:\Users\jack_d\Desktop\SmartcryptMgrTDE-18.0.152\pkmds-tde-18.0.152.zip"->"C:\PKWARE\SmartcryptEnterpriseManager").Configuring PEM Administrator
The script continues to create the PEM Administrator database.
You'll be asked to configure S\PEM.
- Existing or New site: Default is New, but if you have already set up SEM on IIS, type E.
- Name the Site: Default is PK Protect
- Physical Site Location: Default is
c:\inetpub\wwwroot. Edit as required. - Application Name: Default is
mds.
Existing Sites:Name Physical Path---- -------------Default Web Site C:\inetpub\wwwrootConfigure Smartcrypt Enterprise ManagerWould you like to configure an existing or create a new Smartcrypt enterprise manager site?[E] Existing [N] New [Escape] Cancel (default is "N"): NConfirm Configure New Smartcrypt Enterprise Manager SiteAre you sure you want to configure a new Smartcrypt enterprise manager site?[Y] Yes [N] No (default is "Y"): YSetting Up New Smartcrypt Site...Confirm Site NameConfigure site name to be "Smartcrypt"?[Y] Yes [N] No (default is "Y"):Confirm Physical Site LocationConfigure physical site location to be "C:\inetpub\wwwroot"?[Y] Yes [N] No (default is "Y"):Confirm Application NameConfigure application name to be "mds"?[Y] Yes [N] No (default is "Y"):The script will display the existing Application Pools on IIS.
- New Application Pool: Default is New. Highly recommended.
- Application Pool Name: Default is PK Protect.
- Hostname: Default is the current machine.
- HTTPS Certificate: Default is to create a new self-signed X.509 certificate for the host.
The script will create a new self-signed certificate, and ask you to confirm that you want to use it.
Existing AppPools:Name Runtime Version---- ---------------DefaultAppPool v4.0.NET v4.5 Classic v4.0.NET v4.5 v4.0Configure Smartcrypt Enterprise ManagerWould you like to configure an existing or create a new application pool?[E] Existing [N] New [Escape] Cancel (default is "N"):Confirm Configure New Application PoolAre you sure you want to configure a new application pool?[Y] Yes [N] No (default is "Y"):Confirm Application Pool NameConfigure application pool name to be "Smartcrypt"?[Y] Yes [N] No (default is "Y"):Hostname: mkesrv-jd01.qanet.domConfirm HostnameSet hostname to be "mkesrv-jd01.qanet.dom"?[Y] Yes [N] No (default is "Y"): yCurrent Certificates:Thumbprint Subject Friendly Name---------- ------- -------------Https CertificateWould you like to create a new certificate, import a certificate, or use an existing installed certificate?[N] New [E] Existing (default is "N"):Confirm CertificateAre you sure you want to create a new self signed certificated for host=mkesrv-jd01.qanet.dom[Y] Yes [N] No (default is "Y"):Creating New Self Signed Certificate...Created New Self Signed Certificate.Confirm CertificateDo you want to use this certificate?Thumbprint Subject Friendly Name---------- ------- -------------07C844B4E67F4F9D3929D3DD20510571B8F51F09 CN=mkesrv-jd01.qanet.dom Smartcrypt[Y] Yes [N] No (default is "Y"):Connecting to the Database
The script then checks for a connection to the database, and allows you to configure the connection.
- Confirm Database Platform: Default is SQL Server. To change to PostgreSQL, type N and enter
postgresql. - Database Server: Identify the location of the database server.
- Confirm Port: Enter the port for the database.
- Database: Name the database.
- User Id: Identify the owner of the SEM database.
- Password: Supply the database server password for the user you just identified.
- Add Extra Parameter: Default is No. If you want to set an additional required string to access the database, define that here.
The script displays the Connection Information you've entered, and tries to connect. If the database connection is valid, you are asked to confirm the configuration.
Database Connection Information: Platform: SQLServer Server: Database: User Id:Database connection is invalid.Confirm Database PlatformSet database platform to be "SQLServer"?[Y] Yes [N] No (default is "Y"):Database Server: qasrv-db01.qanet.domConfirm Database ServerSet database server to be "qasrv-db01.qanet.dom"?[Y] Yes [N] No (default is "Y"): yConfirm PortSet port to be "1433"?[Y] Yes [N] No (default is "Y"):Database: 180Confirm DatabaseSet database to be "180"?[Y] Yes [N] No (default is "Y"):User Id: qaConfirm User IdSet user id to be "qa"?[Y] Yes [N] No (default is "Y"):Password:Add Extra ParameterWould you like to add an extra connection string parameter?[Y] Yes [N] No (default is "N"):Database Connection Information: Platform: SQLServer Server: qasrv-db01.qanet.dom Database: 180 User Id: qa Port: 1433Testing Connection... [ ] 100 %Database connection is valid.Confirm Database Connection ConfigurationWould you like to use this database connection configuration?[Y] Yes [N] No (default is "Y"): yConfiguring PEM Administrator in IIS
Enter the PEM Administrator Account Password to access SEM.
You'll next be asked to configure the local Administrator user. Supply a username (default is Administrator) and password.
The script will set up an Application Pool, Site and Application in IIS on the server.
Smartcrypt Enterprise Manager Account Password:Smartcrypt Enterprise Manager Account Password (confirmation):Confirm Local Administrator UserConfigure local administrator user to be "Administrator"?[Y] Yes [N] No (default is "Y"): yLocal Administrator Password:Local Administrator Password (confirmation):Creating New AppPool "Smartcrypt"...Created New AppPool "Smartcrypt".Creating New Site "Smartcrypt"...Created New Site "Smartcrypt".Setting Application "/" AppPool...Set Application "/" AppPool.Creating New Application "mds"...Created New Application "mds".Setting Application "mds" AppPool...Set Application "mds" AppPool.Setting Application "mds" Windows Authentication...Set Application "mds" Windows Authentication.Upgrading databaseINFO: Database is currently at version: 0.0INFO: Current version is not equal to the target versionINFO: Upgrading to version: 1.0.60INFO: Upgrading to version: 1.0.61INFO: Upgrading to version: 1.0.62INFO: Upgrading to version: 1.0.63INFO: Upgrading to version: 1.64INFO: Upgrading to version: 1.65INFO: Upgrading to version: 1.66INFO: Upgrading to version: 1.67INFO: Upgrading to version: 1.68INFO: Upgrading to version: 1.69INFO: Upgrading to version: 1.70INFO: Upgrading to version: 1.71INFO: Upgrading to version: 1.72INFO: Upgrading to version: 1.72.1INFO: Upgrading to version: 1.72.2INFO: Upgrading to version: 1.73INFO: Upgrading to version: 1.74INFO: Upgrading to version: 1.75INFO: Upgrading to version: 1.76INFO: Upgrading to version: 1.77INFO: Upgrading to version: 1.78INFO: Upgrading to version: 1.79INFO: Upgrading to version: 1.80INFO: Upgrading to version: 1.80.1INFO: Upgrading to version: 1.81INFO: Upgrading to version: 1.82INFO: Upgrading to version: 1.83INFO: Upgrading to version: 1.83.1INFO: Upgrading to version: 1.84INFO: Upgrading to version: 1.85INFO: Upgrading to version: 1.86INFO: Upgrading to version: 1.87INFO: Upgrading to version: 1.88INFO: Upgrading to version: 1.89INFO: Upgrading to version: 1.90INFO: Upgrading to version: 1.91INFO: Upgrading to version: 1.92INFO: Upgrading to version: 1.93INFO: Upgrading to version: 1.94INFO: Upgrading to version: 1.95INFO: Upgrading to version: 1.96INFO: Upgrading to version: 1.97INFO: Upgrading to version: 1.98INFO: Upgrading to version: 1.99INFO: Upgrading to version: 2.0INFO: Upgrading to version: 2.1INFO: Upgrading to version: 2.1.1INFO: Upgrading to version: 2.2INFO: Upgrading to version: 2.3INFO: Upgrading to version: 2.4INFO: Upgrading to version: 2.5INFO: Upgrading to version: 2.6INFO: Upgrading to version: 2.7INFO: Upgrading to version: 2.8INFO: Upgrading to version: 2.9INFO: Database is currently at version: 0.0INFO: Current version is not equal to the target versionINFO: Upgrading to version: 1.0INFO: Upgrading to version: 1.1INFO: Upgrading to version: 1.2INFO: Upgrading to version: 1.3INFO: Upgrading to version: 1.4INFO: Upgrading to version: 1.5INFO: Upgrading to version: 1.6INFO: Upgrading to version: 1.7Saving IIS ChangesStarting AppPoolAttempting stop...Internet services successfully stoppedAttempting start...Internet services successfully restarted
You are now able to open SEM on https://<hostname>/mds. If you are not able to reach the site, confirm the hostname is routeable via DNS or a hostfile.
Troubleshooting
Mobile and IOS devices cannot connect to the SMDS when it has been configured with this script. This is because these devices cannot use the self-signed certificate created by the setup script. Installing a trusted certificate will allow these types of devices to connect to SMDS.
SQL Server database requirements and setup:
The PEM Administrator requires an empty database, appropriate authentication credentials and permissions. Please perform the following actions, consulting the documentation for your version of SQL Server, if necessary.
Login to your SQL Server and create an empty database
- Give the database a name and note the name down for later (e.g. "PK Protect")
- Set the database collation to: Latin1_General_CI_AS
- Create a database user which the PEM Administrator will use to authenticate to this instance (e.g. pk protect-user)
- Set a database user password and be sure to uncheck options for "Must change password at next logon
- Give the database user the "db_owner" right to the PK Protect database you created above
For More Information about how to authenticate to Microsoft SQL Server, see:
IIS website / application pool requirements and setup:
Perform the following steps on the Windows Server running IIS:
Install the Visual C++ 2012 Runtime
PK Protect is developed with Microsoft® Visual Studio® 2012. The Microsoft Visual C++ redistributable enables some required features for PK Protect. Since PK Protect was created using Visual Studio 2012, the 2012 redistributables are required.
- Download and install the 64-bit version of the redistributable found here: https://www.microsoft.com/en-us/download/details.aspx?id=30679
Configure Internet Information Server for PK Protect
Prior to installing the PEM Administrator website, you must have two features installed and configured on IIS. There are important, if slight, differences in the setups depending on which version of Windows Server you are running.
If you already have these features installed and configured, no changes are required. Skip to “Install Smartcrypt Enterprise Manager.”
Setting up IIS in Windows Server 2012 R2 | Setting up IIS in Windows Server 2008 R2 |
|---|---|
Launch the Server Manager and select IIS
| Launch the Server Manager and select Web Server (IIS).
Enabling .NET Framework 4 Support in IIS (Windows Server 2008)After installing the ASP.NET features in the Server Manager, you must still enable the .NET Framework in Windows Server 2008. This is done from an Administrator command prompt.
|
Install Web Deploy with Microsoft Web Platform Installer
Install Web Deploy through the Microsoft Web Platform Installer (WPI), a free Microsoft tool to install a variety of products into IIS. Download WPI from http://www.iis.net/downloads/microsoft/web-deploy
After you download wpilauncher.exe, run it to see the Web Platform Installer screen. Click the Search box in the upper right corner and type "Web Deploy." Several options may appear, depending on what applications are supported. For your initial installation, we recommend you select the most recent version of Web Deploy with bundled SQL support. At the time this was written, 3.5 was the latest version so for example, Click Add on Web Deploy 3.5 with bundled SQL support. WPI will install everything you need.
Configure Windows Authentication
After adding Windows Authentication to the Windows Server configuration, you must further configure the IIS Manager to permit this. The steps to allow single sign on are the same for both Windows Server 2008 and 2012:
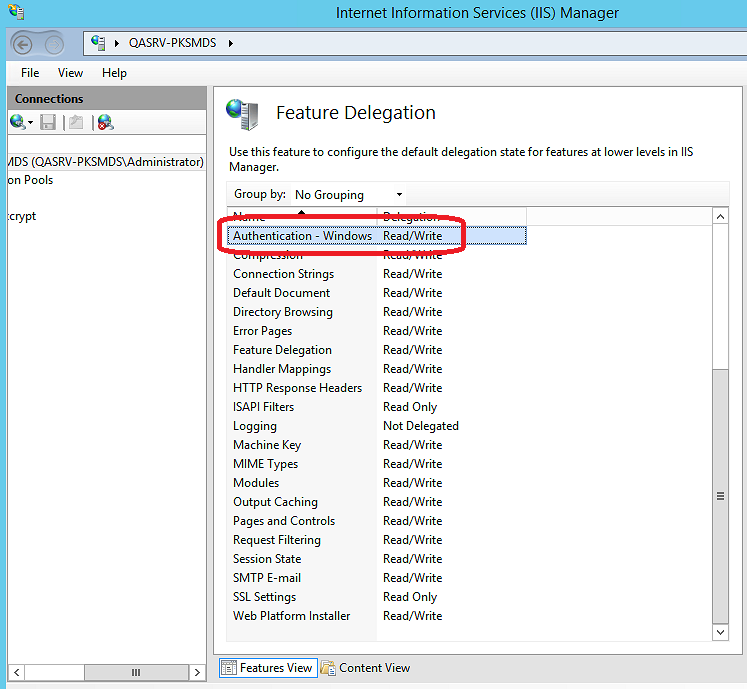
- Open the IIS Manager (Control Panel > Administrative Tools > Internet Information Services Manager)
- In the Management section, select Feature Delegation
- Change the Authentication - Windows setting to Read/Write
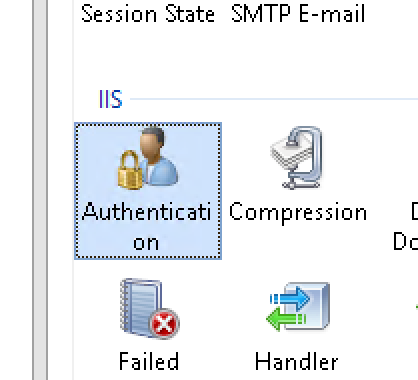
- From the main window, click Authentication.
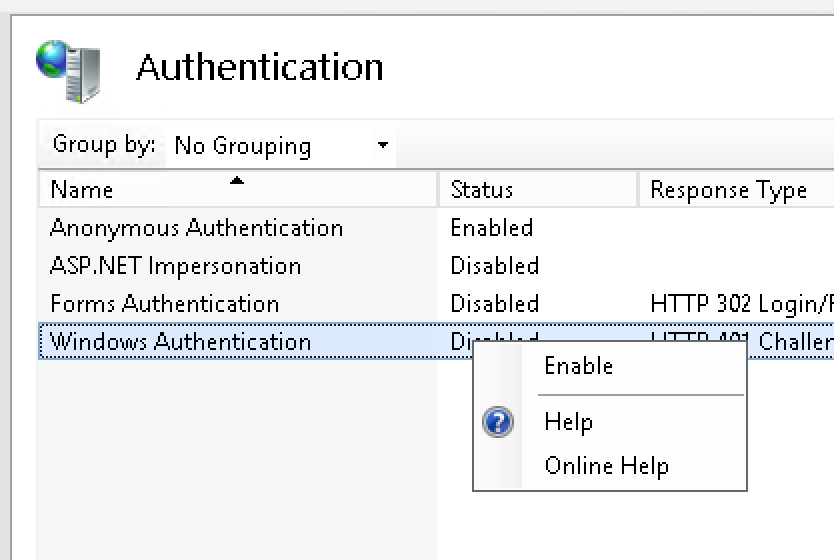
- Right click on Windows Authentication and select Enable (it not already enabled)
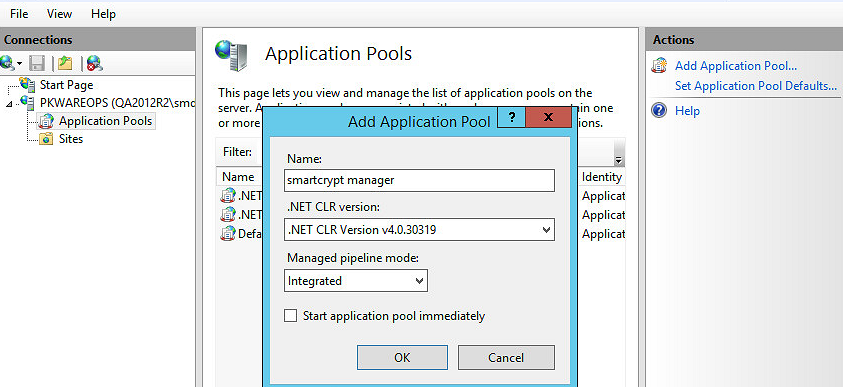
Adding an Application Pool
- Open the IIS Manager (Control Panel > Administrative Tools > Internet Information Services Manager).
- Click View Application Pools to display existing pools.
- Click Add Application Pool.
- Give the Application Pool a name (possibly something like “MDS"). It is appropriate to accept the remaining default options.
Adding a website
- Download the latest package ZIP file from PKWARE to your server. Note: Do not extract the contents of the ZIP archive.
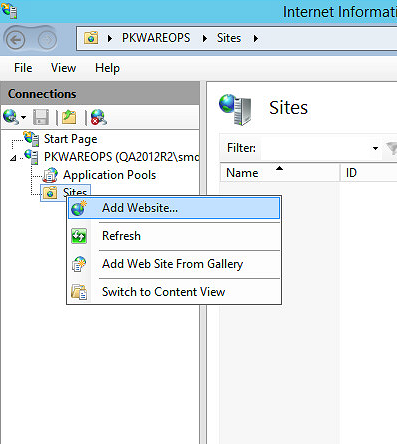
- In IIS Manager, go to Sites.
- Click Add Website. Name it PEM Administrator. The Add Website dialog will open.
- Choose a Site name. This can be the same as the Application Pool.
- Use the Select button to make sure you select the application pool you created in the previous section.
- Define the physical path to the content directory
- (Optional) Select a host name for the site. If you give the website a host name, make sure your domain has proper routing for the host defined in DNS.
If you are accessing PEM Administrator from outside your internal network domain, you also need to create a public DNS entry.
Make sure that the DNS entry points to one or more defined IP addresses (an A Record). PEM Administrator needs a fully qualified domain name to authenticate agents.
Click OK to complete this step and add the website.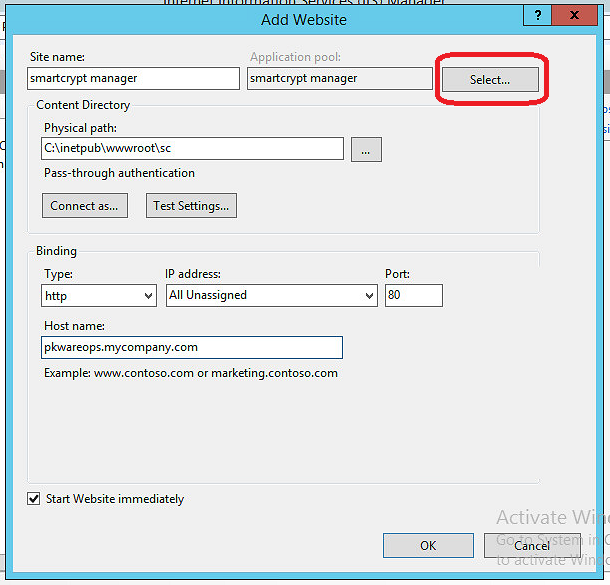
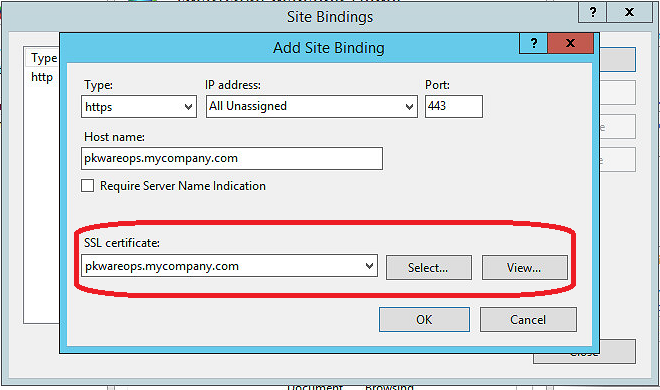
Configuring the website for SSL
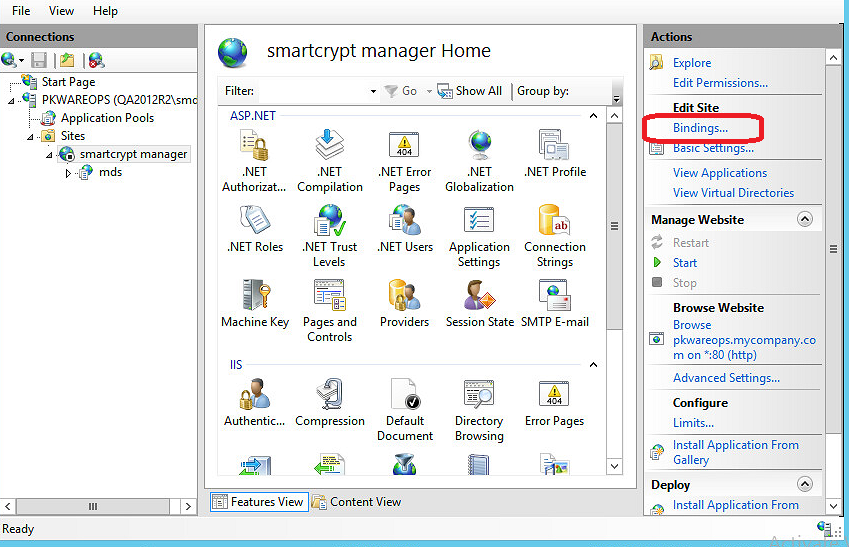
The PEM Administrator requires an SSL connection to protect data being posted to the server. We need to add a binding to enable SSL for this website.
- Highlight the website you created in the earlier section. Select Bindings from the Edit Site options on the right.
- The Add Site Binding screen appears. Select https from the Type: dropdown menu.
- Click Select to choose the SSL Certificate to use for this site.
Verify SSL is working properly!
Verify the site is working properly by pointing your browser to https://<server>/ – you should see the IIS Welcome Page.
Verify the certificate is trusted on your other devices!
If you are using a self-signed certificate, this will require additional steps. Learn how to trust any certificate here.
Installing PEM Administrator
Now that the prerequisites are fulfilled, we are ready to install the PEM Administrator.
Note: The next section assumes you have a .ZIP file containing the PEM Administrator deployment package.
Importing the .ZIP file containing the PEM Administrator web application with Web Deploy
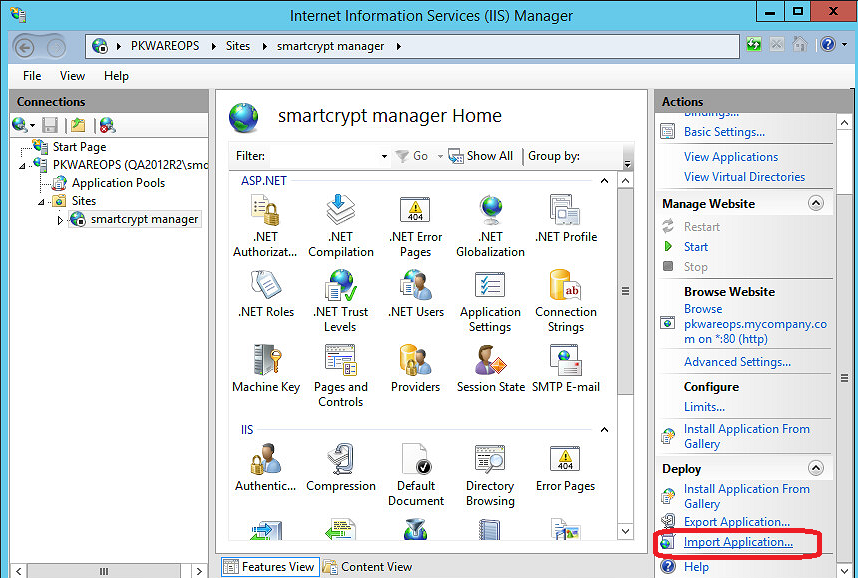
- Highlight the website created above
- In the Action menu on the right side of the screen, select Import Application from the Deploy section
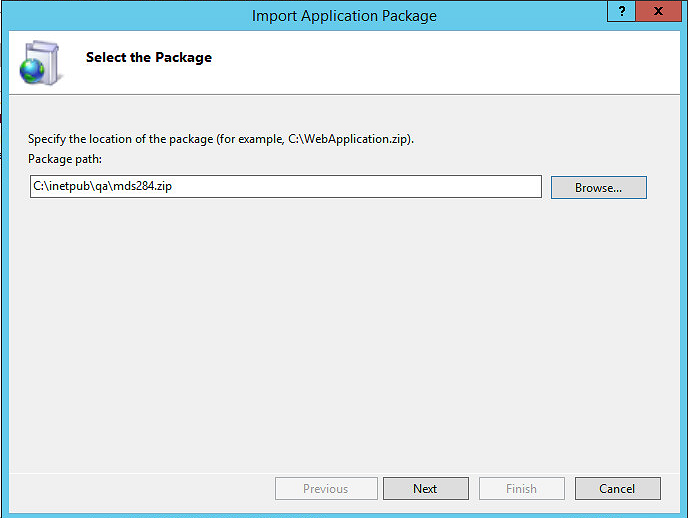
- Web Deploy will launch and ask you to select the PEM Administrator .ZIP file. Browse to the directory where the PK Protect package is located, select the ZIP, and click Next
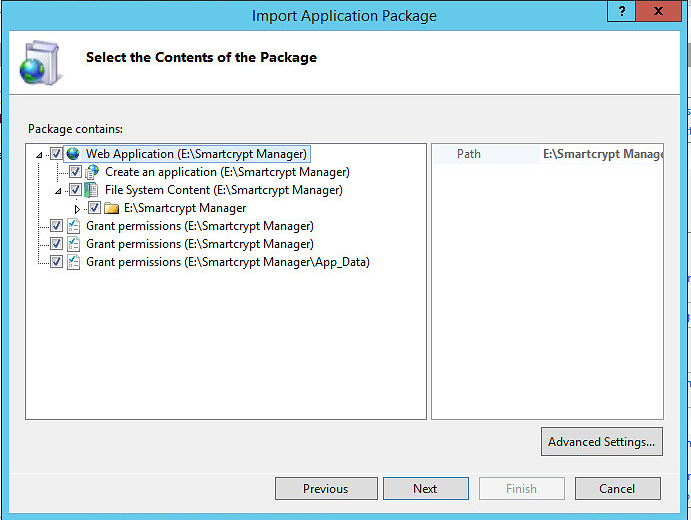
- Web Deploy will scan the ZIP package contents and display them. Review the contents of the package, and click Next to confirm
- Web Deploy will prompt for some application configuration options on the Enter Application Package Information page:

- Set the Application Path to "mds" without the quotes. This is the name of the web application. This name the will appear in the URL you will use to access the Manager
- Set the PEM Administrator Server Password. This password is used to encrypt your encryption keys. It should be securely backed up and not shared with PKWARE.
- Define a root administrator account for the PEM Administrator. This can be a domain account or a local account.
- Domain Account: set a username (AD SysAdmin) only and leave the next two fields blank.
- Local Account: set a username (Local SysAdmin) and a password (Local SysAdmin Password) and leave the AD SysAdmin field blank.
- Set the parameters of the connection string with the information from your database administrator. This value connects PEM Administrator to the database you initially setup
- datasource: The database server name or IP
- initial catalog: The name of the database to be used by the PEM Administrator
- dbuser: The database server username
- dbpassword: The database user password
- Click Next to install PEM Administrator via Web Deploy

Creating the PK Protect database schema
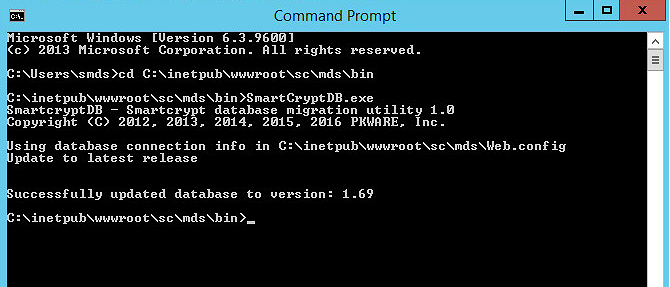
Now that the web application is set up and deployed with SSL configured, the last item we need to complete is populating the PK Protect database with the initial schema. PK Protect comes with a tool to complete this task for you called SmartcryptDB.exe. From the application server running IIS:
- Open a command window (cmd).
- Change directory to the location you installed the website to (above) and look for the bin directory.
- Now execute SmartcryptDB.exe.
- The tool should run and set up the required scheme for the version of the PEM Administrator you have.
Make sure your Application Pool is started and your website is started in IIS. Next, point your browser to https://<server>/<ApplicationPath>/SuperUser to login with the System Administrator credentials (Active Directory or Local) and start using PK Protect.